Introduction
Pls, I Want In was an attack-defence CTF developed over of 8 months by me and a group of friends. This post will go through the architectural designs, infrastructure, and challenges we faced during development, as well as how the game ran on competition day.
Introduction
Hello! My name is James Lowther, and I’m a cloud infrastructure developer with (at the time of this post) 3 years of professional experience managing cloud resources in AWS.
About 8 months ago, me and a group of friends decided to take a stab at developing our own attack-defence CTF. For me, this was something far more complicated than anything I had done before. Many of us on the organizing team have previous experience hosting jeopardy-style CTFs before, but the dynamic nature of A/D CTFs was daunting. Nevertheless, we started development in September of 2023 and, after 8 months of hard work, held the first iteration of Pls, I Want In on May 11th, 2024.
This post will outline the successes and challenges we faced developing Pls, I Want In, while diving deep into the technical nitty-gritty that we had to learn to run the competition.
![]()
Organizing team
Anthony Loria
- Developer of the challenge Pilot
- Helped with CTF testing
Alex Tenney
- Developer of the challenge Teliart
- Communications lead
- Helped with CTF testing
Elli Sengsavang
- Developer of the challenge secrets-pls
- Helped with CTF testing
James Lowther (me!)
- Infrastructure lead
- Developer of the challenge Tea-Sea-Pea
Jeremy Stuart
- Infrastructure developer
- Developer of the challenge Tea-Sea-Pea
Other contributors
Diyaa Alkanakre
- Helped to audit our network infrastructure and security
Dan Sabourov & Fam Ghaly
- Demoed initial iterations of the infrastructure
- Helped test OpenVPN configurations
What is an attack-defence CTF
Tip
If you don’t like reading, this video by LiveOverflow provides a more illustrative example of how the game works.
An attack-defence (A/D) CTF is a unique form of cybersecurity competition where teams are given identical vulnerable servers (vulnboxes) which contain application code with intentionally placed vulnerabilities. These services are often HTTP-based, such as web services, or TCP-based, which have a CLI interface that can be accessed with tools like netcat. Each service contains common security vulnerabilities such as SQL-injections, SSRFs, template injections, buffer overflows, and many more.
What’s important to understand is that each team’s vulnbox is identical. This means that any vulnerabilities a team finds on their server, they also know exist in the services for every other team. The goal of the game is to patch as many exploits as you can on your services, while simultaneously exploiting other team’s services.
Ticks
The game runs on intervals known as “ticks”, which are 2 minutes long. Every tick, several tasks are run by the game server, such as updating the score, checking SLA, and inserting flags into services.
Points
Points are calculated in one of three ways: attack, defence, and SLA.
Attack points
Attack points are accumulated by stealing “flags” from other teams. Flags are just random strings of text that are valid for gaining points. Once per game tick, new, unique, flags are inserted into each team’s services by the game server. By exploiting vulnerabilities, teams can steal these flags and submit them for points.
Defence points
Defence points are lost when another team steals your flags. This means you have an unpatched exploit in your services that another team is taking advantage of.
SLA points
SLA points are gained when your services are up and functional. Once per tick, each of your services are checked to make sure they are working as expected strictly from a functional perspective. If your service is behaving incorrectly or is completely down, you will start to lose SLA points.
Skills
We like A/D CTFs because they force you to learn a wider variety of skills compared to a traditional jeopardy CTF. It provides an opportunity to improve your skills in areas such as red/blue team cyber security, network analysis, software development, DevOps, and many more. The competition is very dynamic, meaning you have to be very reactive to the attacks of other players.
Development goals
When we first started talking about the prospect of actually building an attack-defence CTF, the following goals were identified:
- Create the infrastructure and services for a small-scale A/D CTF, suitable for beginners.
- Create a vulnbox that will have 1-3 services, and can be played within 3-4 hours.
- Host the competition in AWS using cloud-native practices, implementing scaling where we can.
- Creating good documentation and architecture diagrams.
- Everything as code, and as much automation as we can.
- Pipelined as much as we can.
- Monitoring, such as metric/log collection, as much as we can.
- Do it as cost-effective as possible, within reason.
I pushed for developing the competition using AWS, because it is the cloud provider that I have the most professional experience in. I wanted to take this opportunity to improve my knowledge of cloud best practices, such as infrastructure scaling and automation. I wanted the infrastructure to be suitable to competitions of many sizes, allowing it to easily be scaled out to support larger events.
As you will see in the remainder of this post, some of these goals we were very successful in completing, and others… not so much.
Architecture
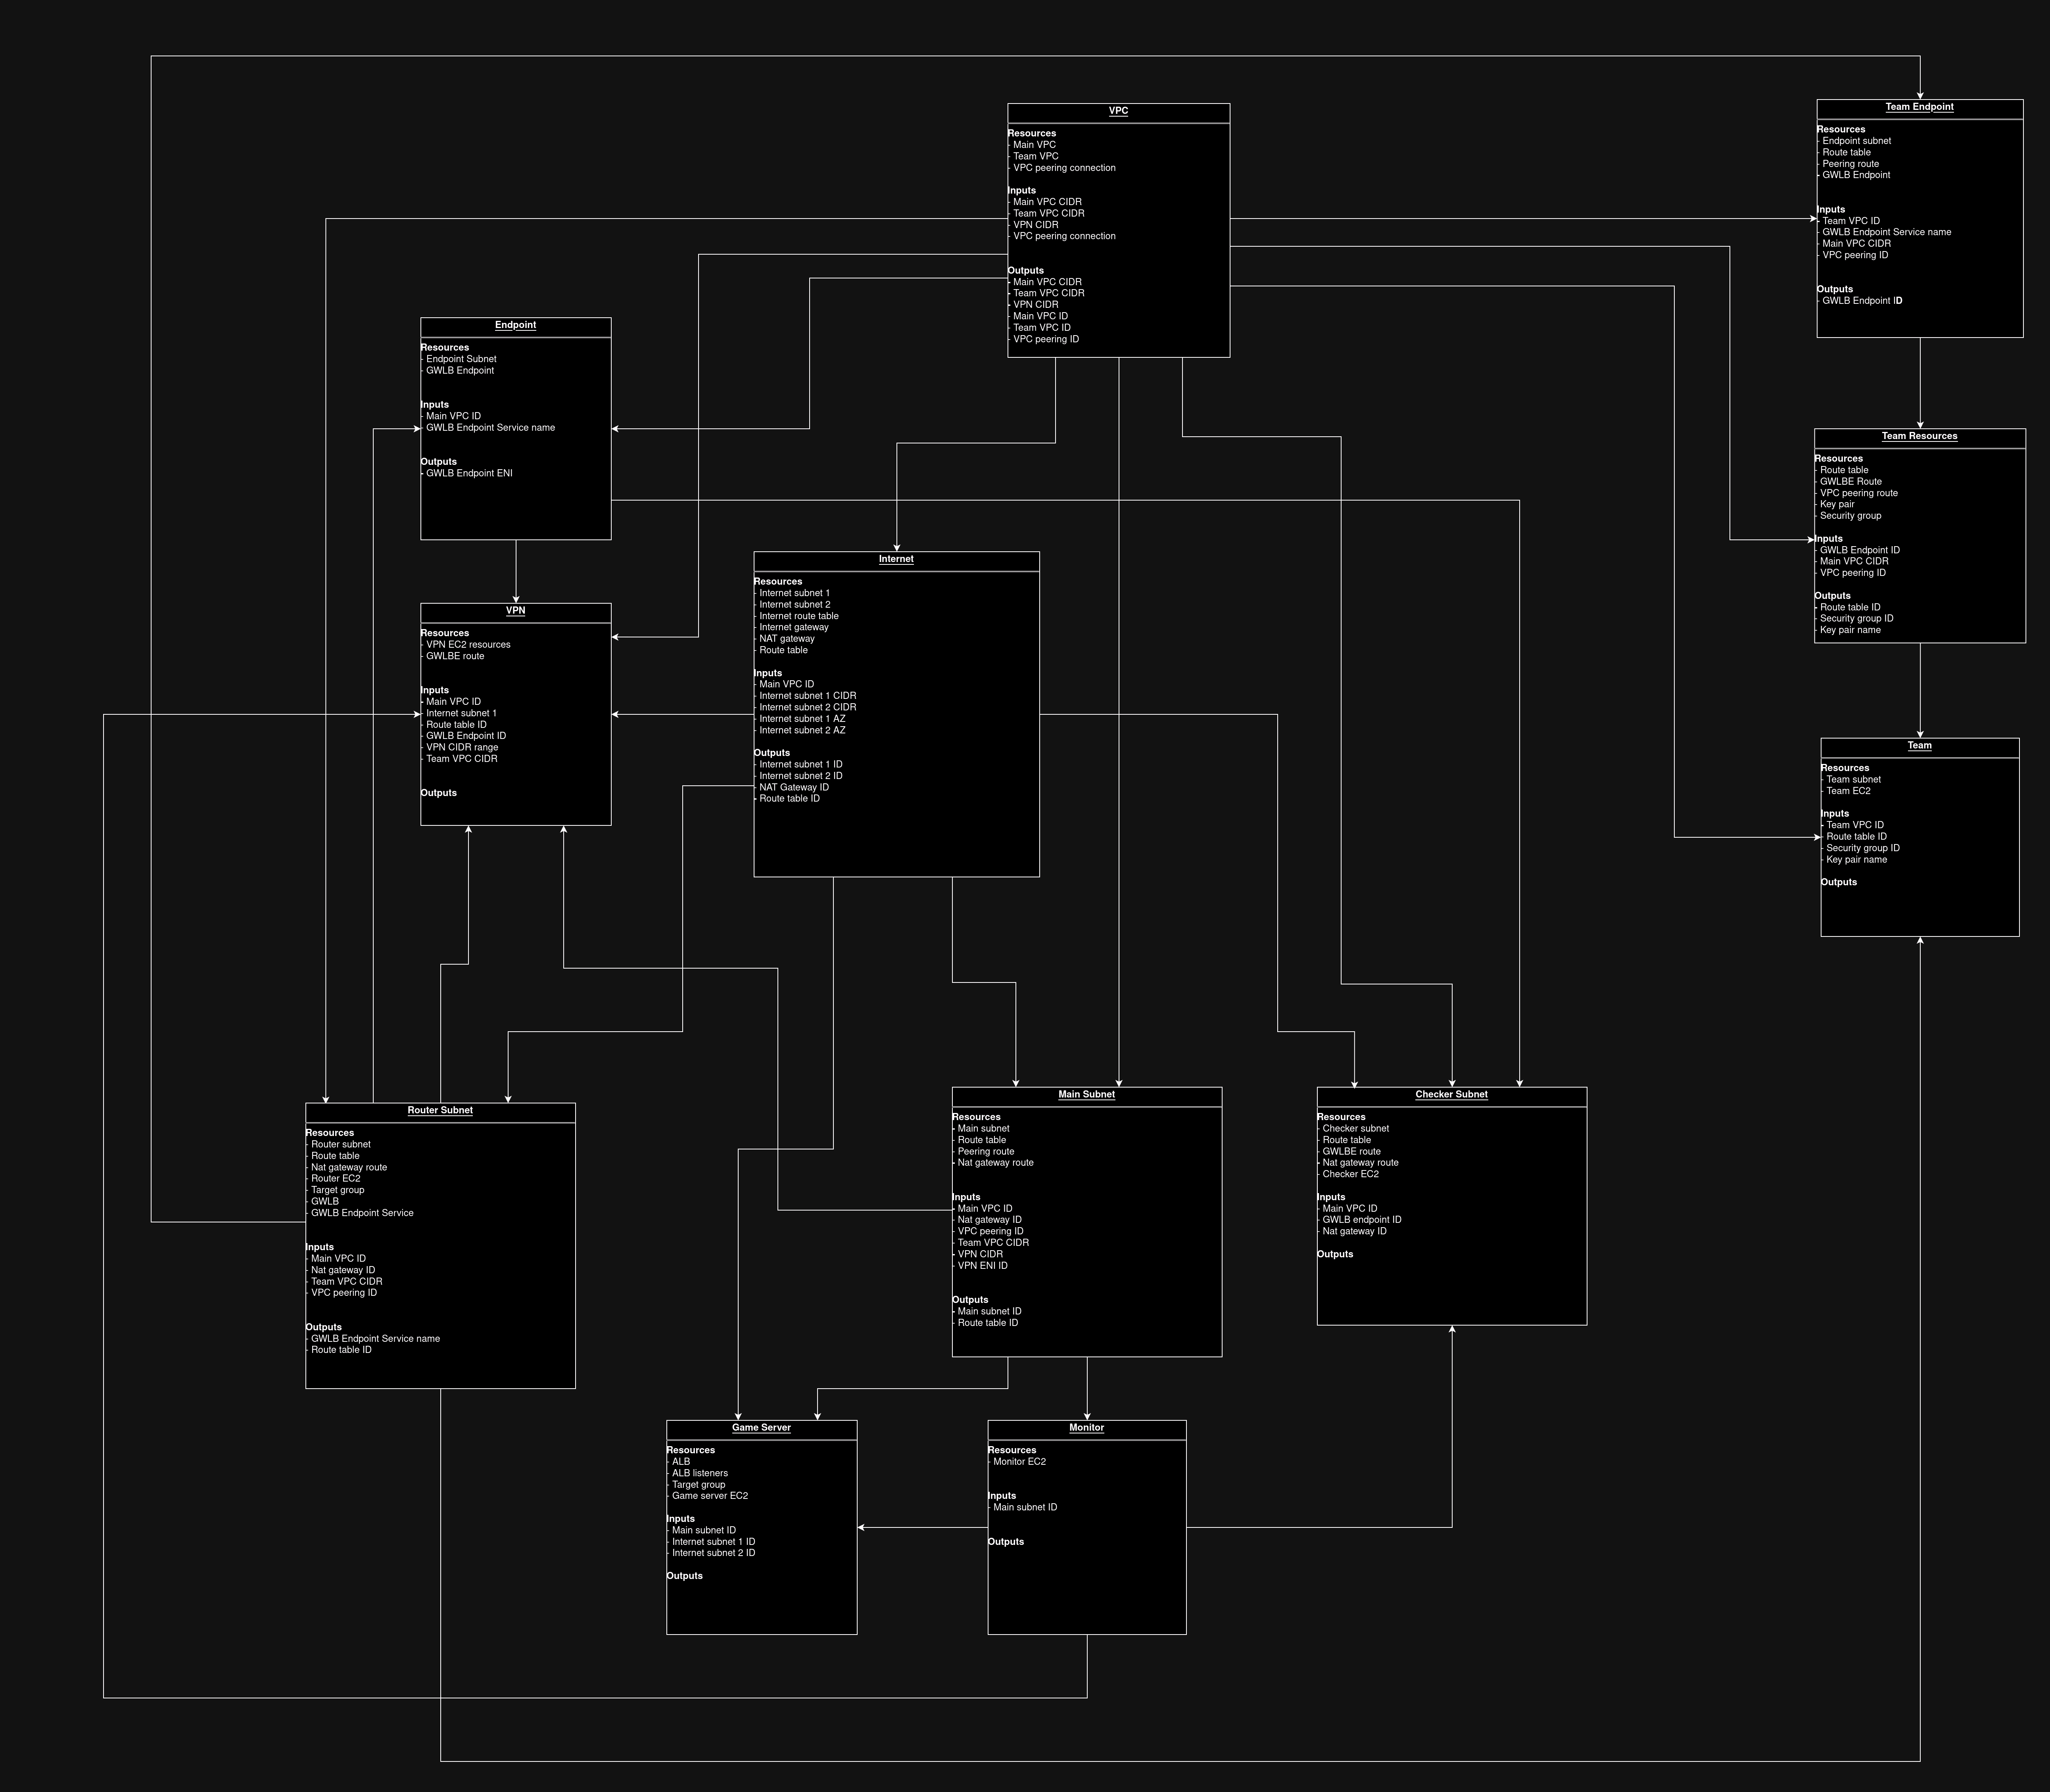
Our architecture diagrams evolved as we learned better ways to solve our problems. Here is the final architecture diagram for Pls, I Want In 2024:
VPCs
Our infrastructure had two VPCs, the “Main” and “Team” VPC. These two VPCs were configured with a VPC peering connection, allowing resources within them to communicate. By creating two VPCs, we were able to easily differentiate between what IPs were organizer-controlled, and which were team-controlled just by using a /16 CIDR.
The team VPC only contained the subnets and EC2s that teams would have control over. This VPC is where the team-controlled vulnboxes lived.
The main VPC had everything else. This included the OpenVPN servers, routers, game server instances, monitoring, and checkers.
Subnets
The way our subnets were configured was primarily driven by the routing requirements that we had. For example, EC2s in the checker subnet needed a specific route to reach the vulnboxes, while servers in the main subnet had no such requirement. By architecting our subnets this way, it made it easier for us to write the route tables to control traffic flow.
You may notice most of the subnets are deployed in the same AZ. This was done intentionally as a cost-saving measure, as AWS charges you for cross-AZ traffic. If we wanted to make the infrastructure more fault-tolerant, we could deploy servers across multiple AZs, but for such a short competition, AZ failure was not a major concern.
Routing
For an A/D CTF, it is important that teams are not able to infer where traffic is coming from. This means that when a vulnbox receives a packet, it should be impossible to tell if that packet originated from a checker, from a VPN client, or from another team’s vulnbox. This is to prevent teams from blocking traffic from other teams using a firewall, thus protecting their flags while allowing only the checkers through.
I’ll speak more about how we implemented this in the Router section of this post, but most of this was handed using custom route tables on the subnets, a gateway load balancer, and iptables.
Internet
Team connectivity from the internet was enabled through load-balanced OpenVPN servers in a public subnet. This will be described further in the OpenVPN section. We also had a NAT gateway to easily handle egress internet access from EC2s in our private subnets.
We have two public internet subnets because it is the minimum number required to deploy an application load balancer.
Net numbers
The net number is a unique number assigned to a team to uniquely identify their traffic. As a convention, the third octet of the IPv4 was used for the net number. For example, a team with net number 7 would have the following IPs:
- Team vulnbox CIDR:
10.32.7.10/32 - Team VPN virtual CIDR:
10.66.7.0/24
We use net numbers to identify which team is sending what traffic. It is also used to determine what team to give points to when players submit flags to the submission server.
V1 Diagram
The complexity increased dramatically as we increased the scope of what we wanted to accomplish. For example, here is the V1 diagram:
Game server
The game server we went with was created and documented by the FAUST CTF team. It is by far the best A/D CTF platform we have seen and was rock-solid stable for our competition. Check out the documentation and source code for this project. They did a fantastic job, and a lot of the success of Pls, I Want In can be attributed to them.
Web interface
The front end for the game server is a standard Django application. We hosted it using uWSGI in master mode, with 4 processes with 2 threads each.
[uwsgi]
uid = www-data
gid = www-data

chdir = /opt/ctf-web
plugins = python3

master = true
die-on-term = true

processes = 4
threads = 2

module = django.core.wsgi:get_wsgi_application()
env = DJANGO_SETTINGS_MODULE=prod_settings

socket = /run/ctf-web/socket
chmod-socket = 660
vacuum = True

buffer-size = 16384
Tip
It was important we increased the
buffer-sizeup to16384, as we would get 500 errors without it when trying to start the game.
This uWSGI process created a Unix socket that was reverse-proxied with nginx. To simplify TLS, we provisioned a wildcard certificate for *.plsiwant.in using AWS ACM which was then attached to an application load balancer. The target group for that ALB then forwarded traffic to the nginx server over HTTP on port 80.
Database
The database we used was a simple PostgreSQL instance running under Docker. To configure the database users and permissions we heavily referenced the database roles from the FAUST ctf-gameserver-ansible repository.
Every 5 minutes we took a backup of the database, in case we needed to recover from a critical failure.
Caching
The Django application was configured to use memcached as its caching backend. The backend we initially chose was PyLibMCCache, but we started seeing a large number of 500 errors even with a tiny amount of traffic. We ran a load test and compared it with the PyMemcacheCache backend.
Run #1 was PyLibMCCache and Run #2 was PyMemcacheCache:
Error
PyLibMCCachehad a nearly 37% failure rate! Switching toPyMemcacheCachesolved nearly all of our performance issues with the web server.
The lesson here was to load test everything, as issues will pop up even on the smallest parts of your infrastructure.
Controller
The controller service was in charge of changing the game tick and coordinating the flags for each service. This ran as a single service on our game server EC2 instance and required access to the database.
Checker
The checkers are responsible for checking team service functionality, placing new flags, and verifying that previously placed flags are still available. We ran the checker on multiple EC2s to ensure we could quickly recover from instance failure. We used the CTF_CHECKERCOUNT environment variable to ensure team checks were equally distributed across each server. With this implementation, we could easily scale the competition size by increasing the number of checker servers.
All of our checkers were written in Python and had their own virtual environment with any custom modules that were requested by the challenge developer. The checkers required access to the database to function.
Submission
The submission endpoint was found at submit.plsiwant.in on port 1337 and is a simple TCP endpoint that has a protocol for accepting flags from teams, allowing them to gain points. We ran three submission services on the game server EC2, and used nginx to transparently load balance packets across them.
Submitting points
The submission server used the third octet in the source IP to determine who to give points to. For example, a team with a net number of 3 would submit flags from an IP
X.X.3.X. This could be from their vulnbox, or locally from their OpenVPN connection.
The submission servers ran locally on ports 10000, 10001, and 10002. The nginx configuration looked like this:
stream {
	upstream stream_backend {
		server 127.0.0.1:10000;
		server 127.0.0.1:10001;
		server 127.0.0.1:10002;
	}

	server {
		listen 1337;
		proxy_bind $remote_addr transparent;
		proxy_pass stream_backend;
	}
}
We then added the following IP rules to transparently proxy the packets to nginx:
ip route add local 0.0.0.0/0 dev lo table 100

ip rule add from 127.0.0.1/32 ipproto 6 sport 10000 iif lo lookup 100
ip rule add from 127.0.0.1/32 ipproto 6 sport 10001 iif lo lookup 100
ip rule add from 127.0.0.1/32 ipproto 6 sport 10002 iif lo lookup 100
The submission services could have been run across multiple servers, but it was so performant we didn’t feel the need to.
OpenVPN
Configs
The client and server OpenVPN configs were fairly standard. We used Easy-RSA to generate the PKI infrastructure and created a separate key and config for each team. I can’t explain this any better than the thousand other blogs about setting up OpenVPN, so I will defer you to this one.
We used an OpenVPN server directive called ccd-exclusive as our authentication method. Each team’s client config got its cert from the CA with a unique common name. When then the client tries to connect, the OpenVPN service for their team would check to ensure there is a file with the same name as the common name in the client-config-dir directory. If not, the connection would be denied.
To ensure that multiple teams could connect using the same client config, we needed to set the duplicate-cn directive on the server. Besides these changes, we then pushed the routes for the team VPC (10.32.0.0/16), the subnet for the submission server (10.50.10.0/24), and the virtual VPN CIDR (10.66.X.0/24, where X is the team’s net number) to the clients.
VPN services
Each team had its own OpenVPN service running on each VPN server, with its own interface. For example, team 7 had an OpenVPN service running on each VPN server that used
tun7as its interface. This was required to ensure that the third octet of each team’s VPN IP matched their net number.It also made it easier to see how much traffic each team was sending on the VPN, as we could just look at the amount of traffic sent on a specific interface.
Scaling & load balancing
It was important that an OpenVPN server could fail completely and the game would still run. This drove us to figure out how to load balance teams across multiple OpenVPN instances, allowing us to scale out dynamically if our CPU load got too high. It also added fault tolerance to the VPN, allowing us to completely lose a server without impacting the game.
One obvious solution to handle load this is to shard teams across multiple instances, but this doesn’t solve the problem of high availability. If 1/4 of all teams are sharded on a single VPN instance, and that instance fails, then those users will experience downtime. To solve this, we used DNS-based load balancing and multiple OpenVPN servers. By having a DNS A-record with multiple public IP addresses, the OpenVPN client will randomly choose one of them each time the domain is resolved.
OpenVPN has a good, but short, article on load balancing that recommends putting identical configuration files on each server, but changing the virtual address pool. This is something we didn’t want to do, as it would increase the chance of CIDR overlap issues on the player’s local networks. We advertised that the VPN route we would be pushing over to people’s locals was 10.66.X.0/24, with X being their team net number, and I wanted that to be the same regardless of which of our VPN servers they were connected to. We didn’t want VPN A to push 10.66.X.0/24 and VPN B to push 10.67.X.0/24.
This introduced a new problem. If each virtual IP pool is the same, how do we ensure that a connection sent from VPN server A is routed back to the same server? The obvious answer is to add some sort of SNAT on each server, but due to the unique nature of A/D CTFs, we had to keep the third octet static for each team to support proper flag submission.
Remember
The third octet of a packet’s source is the team’s net number and is used by the submission server to determine who to give points to. A request sent from
10.66.10.6/32with a valid flag should give points to team 10. If we NAT the packets, all of the packet sources will be the same.
To solve this, we used an iptables rule type known as NETMAP. NETMAP builds a one-to-one translation for an entire subnet, allowing us to change the first 16 bits in the source address while leaving the bottom 16 untouched. It can be thought of as an SNAT, but only for the first 16 bits.
- VPN A:
10.66.X.0/24→10.80.X.0/24 - VPN B:
10.66.X.0/24→10.81.X.0/24 - VPN C:
10.66.X.0/24→10.82.X.0/24
For example, a client from team 7 connecting to VPN B would have their packets from tun7 have a source like 10.66.7.20. When that packet leaves VPN B, the packet would be translated to 10.81.7.20, preserving their net number in the third octet.
VPN CIDR
We used the range
10.80.0.0/13to match all VPN traffic. This range gave us the flexibility to scale out to a max of 8 VPN servers if need be.
For anything that needs to communicate to the VPN servers, we can then add routes in the route tables for 10.80.0.0/16, 10.81.0.0/16, and 10.82.0.0/16 to the ENIs for VPN A, VPN B, and VPN C, respectively.
To ensure that we have identical OpenVPN configs on each server we used a AWS Elastic File System (EFS) network file share. This made it trivial to share the OpenVPN server config files across EC2s. To scale out, all we would need to do is create a new server, mount the EFS share, and start the OpenVPN services.
Success
With this implementation, we could load balance OpenVPN connections across multiple servers completely transparently to the end user. We could increase the number of servers to handle the increased load without having to manually shard connections.
One improvement would be to add a network load balancer in front of our OpenVPN servers. This would reduce the number of public IPs required when scaling, as by default AWS limits the amount of EIPs on an account to just 5.
Router
The router is one of the most critical pieces of infrastructure for an A/D CTF. All packets relating to the game must be sent through the router. The router does the following:
- Anonymizes network traffic.
- Acts as a firewall.
- Limits bandwidth.
- Acts as a central point for monitoring.
Load balancing
Load balancing the router was something I really wanted to do because it gave us lots of flexibility to make changes to our infrastructure during the competition without causing major downtime. If a router server failed, we wanted the game to continue to run without noticeable impact.
To do this, we used an AWS gateway load balancer (GWLB), and AWS PrivateLink endpoints. PrivateLink allowed us to create gateway load balancer endpoints (GWLBE) in the two VPCs, which could then be set as the destination for inter-team packets in the route tables for each subnet. The GWLBEs would then send these packets to the gateway load balancer, which would encapsulate the packet in the GENEVE protocol and send it to a target group on UDP port 6081.
To handle these packets, we used an AWS-provided solution called gwlbtun. This is a service that listens for GENEVE packets on port 6081, unencapsulates them, and sends them to a virtual interface with the naming convention gwi-<gwlbe-eni-id>. Once these packets are processed by gwlbtun, we can handle them as normal using the standard Linux network stack.
This article by AWS explains this solution in far more detail. It also provides this handy diagram explaining how it works:
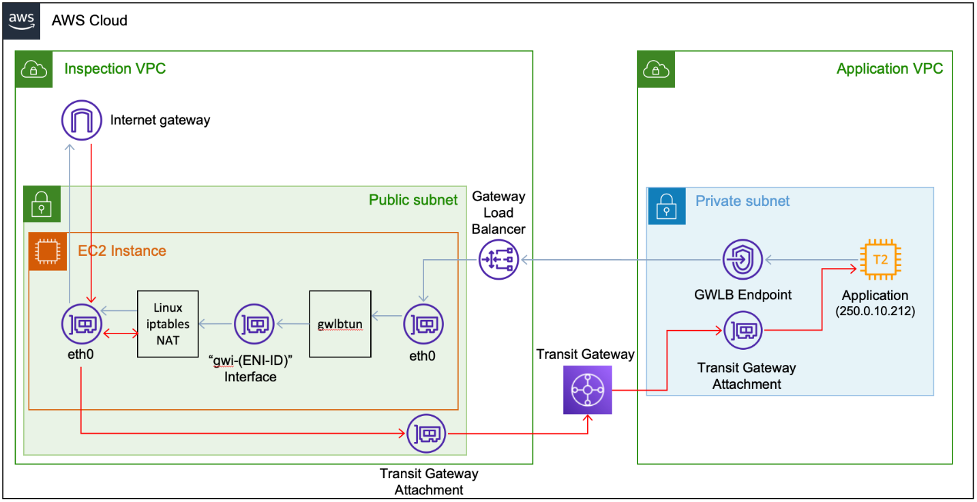
Success
With this solution, we could scale the router horizontally to support any increase in load. We weren’t limited to vertical scaling and didn’t have a single point of failure. Because packet flows are distributed equally between routers in the target group, if one of our routers failed, or if we needed to restart it for maintenance, the impact on the game would be minimal.
I was incredibly proud of this solution because it added fault tolerance to the infrastructure that is traditionally very static.
Anonymizing traffic
Network traffic must be anonymized for the game to run smoothly. This is primarily to prevent teams from identifying the checkers.
Remember
The checkers are what check team services for SLA, as well as adding/checking flags.
If a team can identify the checker, they could easily add a firewall on their vulnbox to only allow traffic from that IP source. This would mean the checker would successfully verify the service as working, but no other team would be able to exploit it. This is against the point of the game.
MASQ
To help anonymize traffic, we used a simple MASQUERADE rule in iptables. This ensured that all traffic appeared to be coming from a single source, i.e. the router’s IP. We also added a mangle rule to set the TTL of the packet to 30, ensuring that differences in hops wouldn’t give away a packet’s origin.
# MASQ
iptables -t nat -A POSTROUTING -o ens6 -j MASQUERADE

# TTL Mangle
iptables -t mangle -A POSTROUTING -p tcp -d '10.32.0.0/32' -o ens6 -j TTL --ttl-set 30
HAProxy
Our HAProxy configuration was directly inspired from this talk from HAProxyConf 2022 by Felix Dreissig and Simon Ruderich of the FAUST CTF team. It’s well worth a watch.
We used HAProxy to act as a transparent proxy for HTTP traffic. A TPROXY iptables rule would route packets destined for HTTP services transparently to the HAProxy service, which would then strip out any non-essential headers. We would then add our own header, X-Pls-Proxied: True, to identify to teams that we had intercepted the request.
Before:
GET /index.html HTTP/1.1
Host: 10.32.7.10:7777
User-Agent: Mozilla/5.0 (X11; Linux x86_64; rv:126.0) Gecko/20100101 Firefox/126.0
Accept: text/html,application/xhtml+xml,application/xml;q=0.9,image/avif,image/webp,*/*;q=0.8
Cookies: auth=foobar
Accept-Language: en-US,en;q=0.5
Accept-Encoding: gzip, deflate
Connection: keep-alive
Upgrade-Insecure-Requests: 1
Priority: u=1
After:
GET /index.html HTTP/1.1
Host: 10.32.7.10:7777
Cookies: auth=foobar
X-Pls-Proxied: True
Our HAProxy config looked something like this:
frontend http-frontend
	mode http
	bind 0.0.0.0:5001 transparent
	default_backend http-backend

	timeout client 16s
	timeout http-request 16s

	option accept-invalid-http-request

	http-request del-header ^(?!content-type$|content-length$|cookie$|host$|origin$|range$|x-csrftoken$|access-control-allow-origin$) -m reg

backend http-backend
	mode http
	# `server*` to connect to original destination server
	server test-name *
	source 0.0.0.0

	timeout server 16s

	option accept-invalid-http-response

	http-response add-header X-Pls-Proxied True
	http-request add-header X-Pls-Proxied True
For each port running an HTTP-based service, we added a local route/rule that tagged the packet and an iptables rule to the PREROUTING chain which directed it to HAProxy:
# Routes/Rules
ip route add local 0.0.0.0/0 dev lo table 100
ip rule add pref 50 fwmark 0xb33f lookup 100

# TPROXY
iptables -t mangle -A PREROUTING -p tcp --dport $PORT -d '10.32.0.0/16' -j TPROXY --on-ip 127.0.0.1 --on-port 5001 --tproxy-mark 0xb33f
Firewall
We split the game into three distinct parts:
- Before network closed
- Network closed
- Network open
Before network closed
At this point in the game we allow people the ability to connect to OpenVPN, and test the submission server, but we don’t allow teams to SSH into their vulnbox.
DROP rules were added to drop all traffic coming from the VPNs:
iptables -A FORWARD -o ens6 -s '10.80.0.0/13' -j DROP
iptables -A INPUT -o ens6 -s '10.80.0.0/13' -j DROP
Network closed
Teams can SSH into their vulnbox, but can’t interact with other teams (besides NOP). Teams are encouraged to patch as many of their services as they can before the network opens.
We used UFW here so that opening the network would just require us to run sudo ufw disable. In hindsight, we could probably remove UFW altogether and get the same result with iptables rules.
Network open
Full network connectivity between all teams. The game has started.
UFW is disabled and DROP rules are deleted.
Admin VPN
We left the net number 0 available for administration purposes and created a special VPN config for it. We allowed connections from the 10.66.0.0/24 range full access to all teams during any point in the game. This VPN config was used by us to SSH and check vulnbox functionality before the game started.
Only the CIDRs of the admin VPN were able to view the monitoring services and access the admin page for the game server. Most of this access control was managed with security groups.
Limiting bandwidth
It was important to me that we limit bandwidth, not because it would prevent DoS attacks against other teams, but because I was scared for my wallet. From the vulnbox, all access to the internet would first go through the router, then out from AWS through a NAT gateway. AWS charges $0.045 per GB of traffic sent through a NAT gateway. Without adding bandwidth limiting, a malicious team could download a lot of data on my dime.
Hashlimit
We originally tried to limit bandwidth using an iptables module called hashlimit. The way this works is by classifying each packet into a bucket using a specified hash. If the number of packets in each bucket exceeds the configured threshold, iptables will drop the packet. We first tried hashing the packets based on the source IP.
iptables -A FORWARD -m hashlimit -m tcp -p tcp --hashlimit-mode srcip --hashlimit-srcmask 32 --hashlimit-above 10/sec --hashlimit-burst 2 --hashlimit-name pktlimit -j DROPThis sort of worked, but was very inconsistent in limiting the throughput. This blog post does a great job of explaining the problem we faced. The hashlimit modules works in a binary fashion in that it will either allow or drop the packet. This, combined with the robustness of TCP, makes it very difficult to fine-tune the bandwidth.
TC
TC (Traffic Control) is the solution we ultimately ended up going with. TC works by shaping traffic by using queues (qdiscs), which will delay packet transmission instead of just dropping the packets.
We used a HTB (hierarchy token bucket) qdisc with a class for each team, specifying the bandwidth limit to be 50mbit/s. We then used filters to classify packets into classes based on their third-octet net number. We used a SFQ (stochastic fairness queueing) qdisc to ensure that bandwidth between each team’s clients was evenly distributed.
Per-team limiting
What was cool about this solution is it allowed us to limit bandwidth not just per IP, but per team. This means that if the vulnbox was using 20mbit/s worth of bandwidth, then VPN clients for that team could share only 30mbit/s between themselves. This gave me peace of mind, as I could now calculate the worst-case egress charge from AWS and adjust the bandwidth accordingly.
One major problem with TC ingress shaping is that it does its processing between the iptables and the network interface. This means that trying to filter packets into classes using just the source IP will not work because by the time the packet reaches TC it has already been MASQ’ed by iptables. If all packets have the same source IP, how do you classify them?
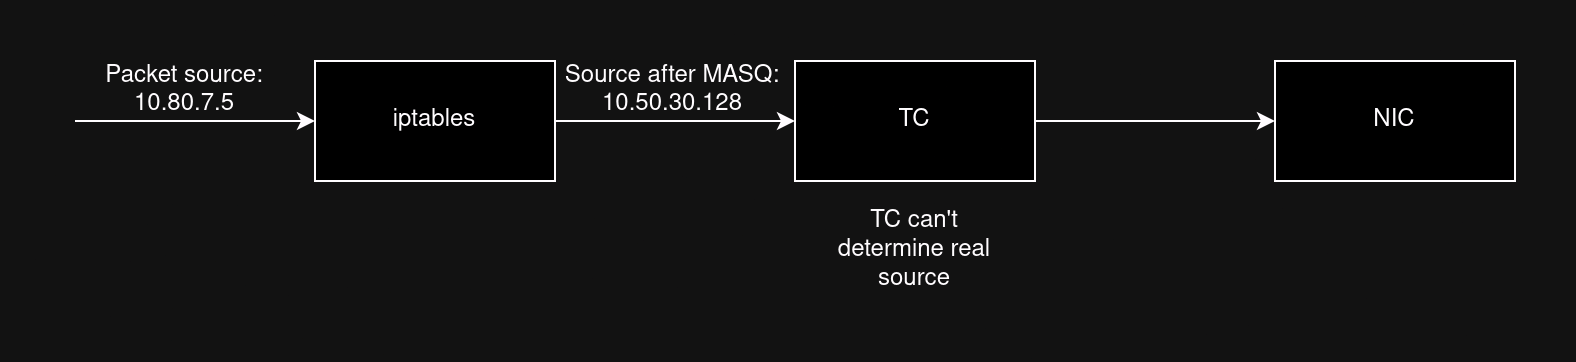
The solution we landed on was a modified version of this solution from the Arch Linux wiki. Instead of filtering packets based on their source IP, we filter them based on a packet mark set by iptables, where the mark is equal to the packet’s net number. This means we can classify packets into teams, even though the source IP is the same. We used CONNMARK --save-mark and CONNMARK --restore-mark to allow this to work.
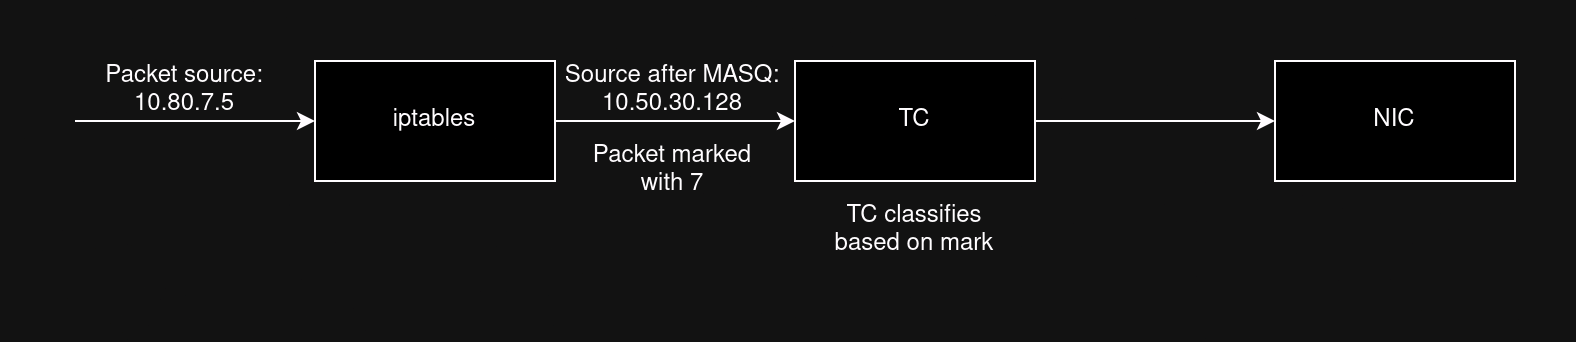
Here is the script, at a high level:
# Create primary qdisc
tc qdisc add dev ens6 root handle 9999: htb default 0
tc class add dev ens6 parent 9999: classid 9999:0 htb rate 1gbit

# Create QOS chain for FORWARD and OUTPUT chains
iptables -t mangle -N QOS
iptables -t mangle -A FORWARD -o ens6 -j QOS
iptables -t mangle -A OUTPUT -o ens6 -j QOS

# Add CONNMARK restore-mark on QOS chain
iptables -t mangle -A QOS -j CONNMARK --restore-mark

# Team 1
tc class add dev ens6 parent 9999:0 classid 9999:1 htb rate 50mbit
tc qdisc add dev ens6 parent 9999:1 handle 1: sfq perturb 10
tc filter add dev ens6 parent 9999: protocol ip handle 1 fw flowid 9999:1
iptables -t mangle -A QOS -s '10.32.1.0/24' -m mark --mark 0 -j MARK --set-mark 1
iptables -t mangle -A QOS -s '10.80.1.0/24' -m mark --mark 0 -j MARK --set-mark 1
iptables -t mangle -A QOS -s '10.81.1.0/24' -m mark --mark 0 -j MARK --set-mark 1

# Team 2
tc class add dev ens6 parent 9999:0 classid 9999:2 htb rate 50mbit
tc qdisc add dev ens6 parent 9999:2 handle 2: sfq perturb 10
tc filter add dev ens6 parent 9999: protocol ip handle 2 fw flowid 9999:2
iptables -t mangle -A QOS -s '10.32.2.0/24' -m mark --mark 0 -j MARK --set-mark 2
iptables -t mangle -A QOS -s '10.80.2.0/24' -m mark --mark 0 -j MARK --set-mark 2
iptables -t mangle -A QOS -s '10.81.2.0/24' -m mark --mark 0 -j MARK --set-mark 2

# ... add all teams

# Add CONNMARK save-mark on QOS chain
iptables -t mangle -A QOS -j CONNMARK --save-mark
Vulnbox & Services
The vulnboxes are the servers that teams are given full root access to. They contain all of the source code for the vulnerable services, and that’s about it. SSH was configured to allow password-based authentication, and the password for the admin user was changed to one that could be distributed to teams. The vulnboxes were based on Debian 12.
Vulnbox workflow
The vulnbox was one of the main pieces of infrastructure that were fully pipelined to the point where we created golden AMIs. In a separate repo, we created a GitHub Actions workflow that would kick off a Packer build using the amazon-ebs builder. This would create a temporary EC2 server, provision it using an Ansible playbook, and then make an AMI (Amazon Machine Image). When we then created the full CTF infrastructure, we would create the vulnboxes dynamically using the latest AMI version, ensuring each team’s vulnbox was identical.
The builder in our Packer config took looked like this:
build {
  sources = [
    "source.amazon-ebs.vulnbox"
  ]

  provisioner "ansible" {
    user             = "admin"
    playbook_file    = "../../ansible/vulnbox.yml"
    extra_arguments  = ["--extra-vars", "var_file=${var.environment}.yml", "--scp-extra-args", "'-O'"] # Required for OpenSSH >=9.0
    ansible_env_vars = ["ANSIBLE_FORCE_COLOR=1"]
  }
}
Environments
We would specify a
var_fileas an Ansible argument to overwrite the default variables in the roles. The variable files would contain environment-specific configuration values. This let us easily make AMIs for different environments using the same Ansible code.
When creating the vulnbox in Terraform, we used cloud-init to dynamically set the password:
user_data = <<-EOF
#cloud-config
ssh_pwauth: true
password: ${bcrypt(var.vulnbox_password)}
chpasswd:
  expire: false

runcmd:
  - systemctl reload ssh.service
EOF
SSH
The
systemctl reload ssh.servicewas required to fix a strange bug where about 30% of the time cloud-init would successfully configure OpenSSH to allow password authentication in the sshd config file, but it would not correctly restart the service. By explicitly restarting sshd, it seemed to fix the problem.
Encryption
We also added an encryption feature to the vulnbox pipeline. If toggled on, the Ansible playbook would encrypt all of the challenge code on the server before taking an AMI. We could extend this in the future to allow teams to host their own vulnbox, and then decrypt the challenges when we release the key when the game starts.
Service workflow
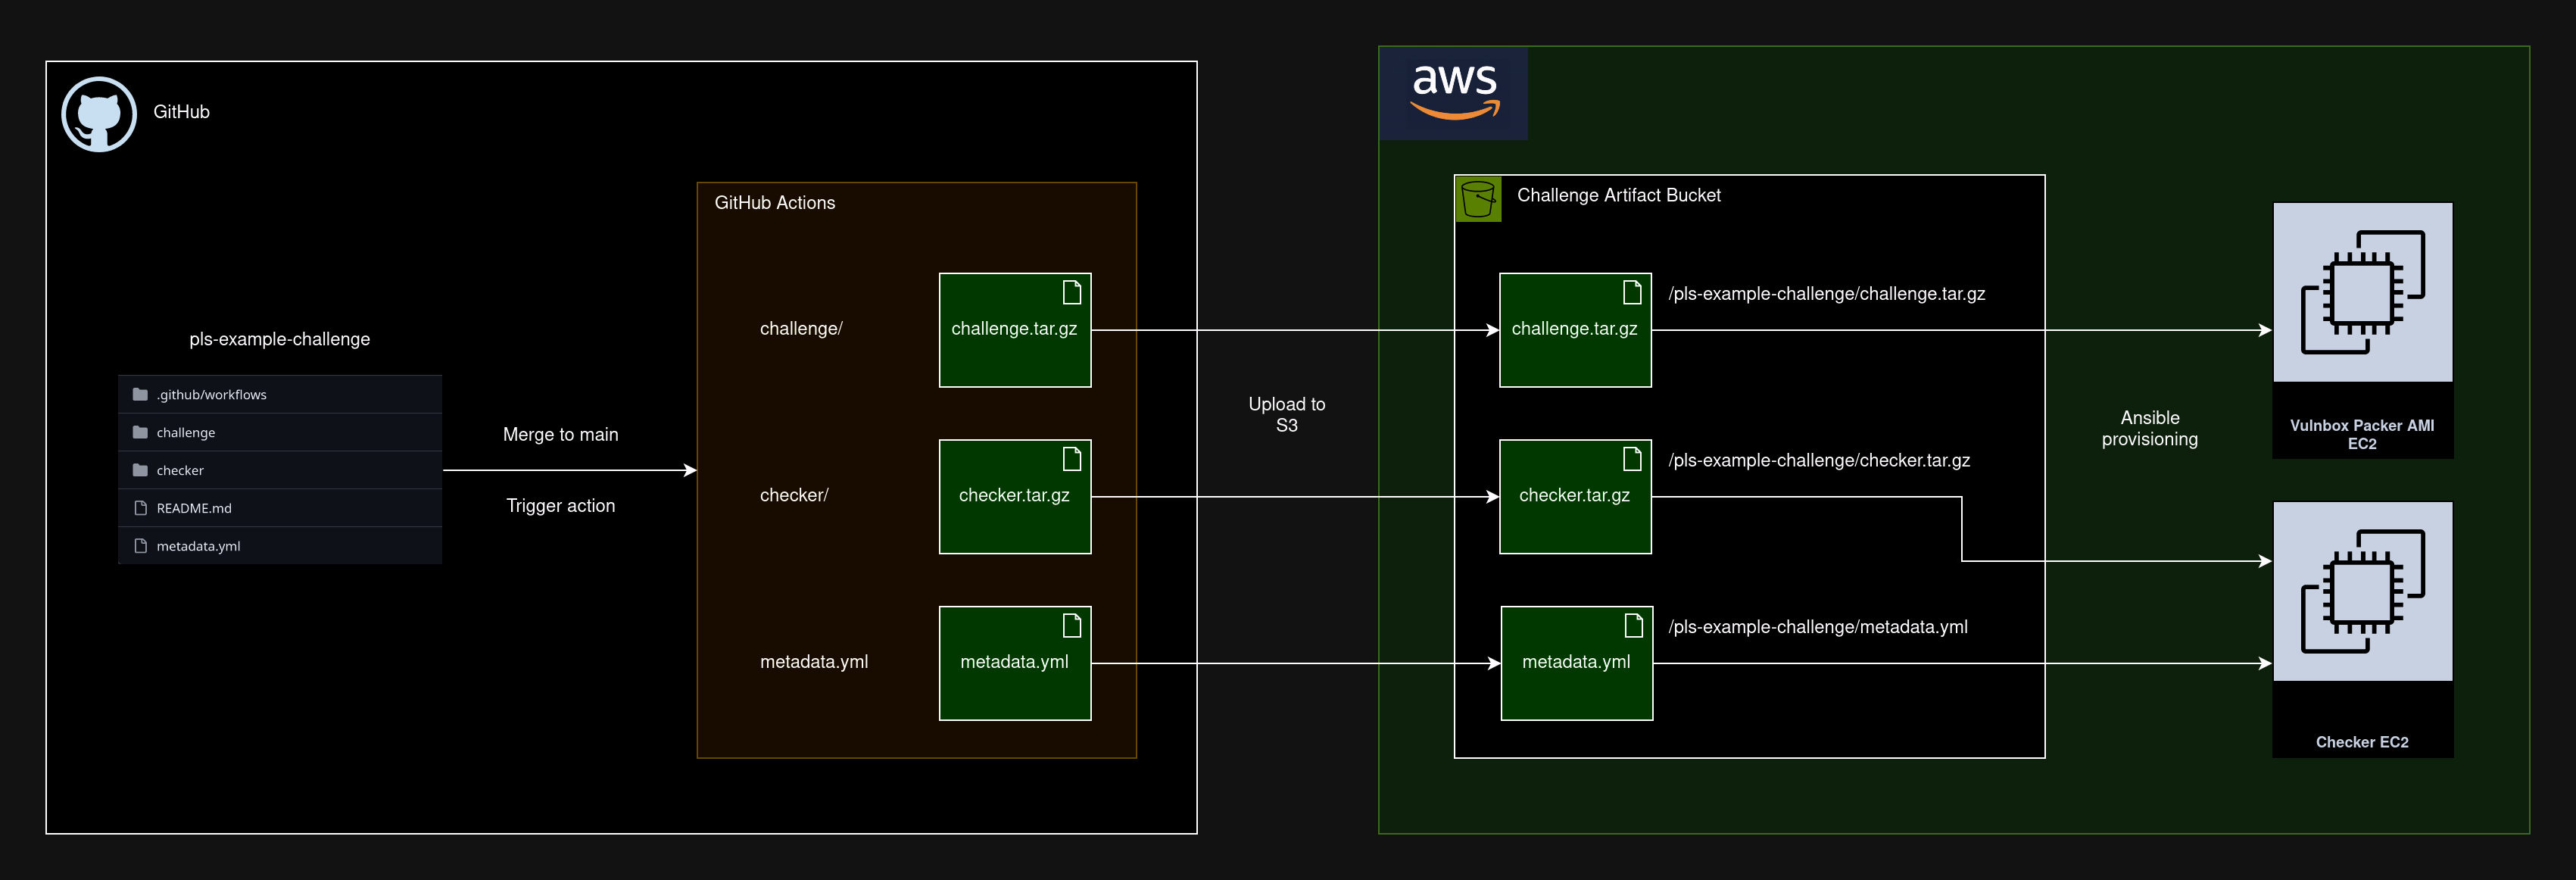
Each service had a repo with a challenge/ and checker/ directory, and a metadata.yml file. When changes were pushed to the main branch, a GitHub Actions run would tar and gzip the challenge and checker directories, and push the artifacts to an S3 bucket. The metadata.yml would be uploaded as well.
The metadata would look something like this:
challenge_name: Example Challenge
challenge_slug: example-challenge

checker:
  apt_packages: []
  pip_packages: []
Our Ansible playbooks then had tasks to pull the required artifacts down from S3 to then be provisioned on the instance. For example, the vulnbox role would pull the challenge artifacts down, de-compress them, and run an init.sh script to initialize the service with Docker Compose. The checker roles would pull the checker artifact, install the apt/pip packages, and start the checker service.
This workflow made it very flexible when developing challenges. We wanted the CTF infrastructure to be service-agnostic. To create a new service, all someone would need to do is create a new repo off of the template repo, add their code, and know it would integrate with the CTF infrastructure.
Automation
Automation, automation, and more automation. Our full automation of all parts of the CTF was one of the main drivers of our success. Doing things manually becomes tedious and introduces human error. By allowing us to easily create and destroy the entire CTF infrastructure, we could develop and iterate at a much faster pace.
All of the AWS resources were fully managed through Terraform modules. All of the VPCs, subnets, servers, security groups, peering connections, EFS shares, etc., were all written using Terraform.
Deployments
During our development, we used our automation to create and destroy the infrastructure 68 times. Without automation, this would not have been possible, and our development would have been slower.
Terraform
For deployment, we used Terraform in conjunction with Terragrunt. I like Terragrunt, because it dramatically simplifies managing remote state. All state was stored in S3, with DynamoDB used as a state lock. We used the dependency feature of Terragrunt to glue module inputs/outputs together. This approach lets us have a separate state file for each module, instead of one massive state file for all resources.
This saved us a few times when our self-hosted GitHub runner ran out of memory and killed the Terragrunt service. Instead of losing the entirety of the state, we only lost the state for the module that was running at the time as it hadn’t been pushed to S3. Without this, we would have had to do a lot of manual resource cleanup.
Terragrunt
While I like a lot of what Terragrunt offers, it’s not perfect. Because Terragrunt runs a separate Terraform deployment for each module, if a higher-level module changes, it’s harder to see the impact on dependent modules in the Terraform plan.
Here’s one of the goals that I had outlined before: create good documentation. Well… here is the documentation for our Terraform modules:
As you can see, I could use a bit of practice in structuring Terraform code to not be so coupled. This architecture worked for the CTF, but it could use a lot of improvement.
Ansible
All EC2 server configuration was done using Ansible. Each server type had its own playbook file, which would run tasks in a number of roles. We used the group_vars/ convention in the inventory directory to overwrite variables on a case-by-case basis. By doing it this way, we could easily configure and deploy multiple environments using the same Ansible code.
Everything was configured in Ansible, even services that didn’t support configuration-as-code. For these edge cases, we wrote custom Python scripts that would be invoked by the ansible.builtin.command task and would use the requests module to configure the services on our behalf using HTTP. A good portion of the game server role (specifically the database user configuration) was derived from the ctf-gameserver-ansible repo provided by the FAUST team.
EC2 instances were tagged by their purpose (monitoring, vpn, etc.) and their environment, allowing us to use the AWS dynamic inventory plugin to generate the Ansible inventory. We heavily utilized AWS SSM to allow Ansible to connect to the EC2 without needing direct SSH access.
Multiple environments
We were able to create a demo, test, practice, and production environment at the same time, just by changing a few Ansible/Terraform variables. This was important, as it allowed us to develop on smaller EC2 instance sizes to save money while being confident that the same code would run when we deployed to the larger production environment.
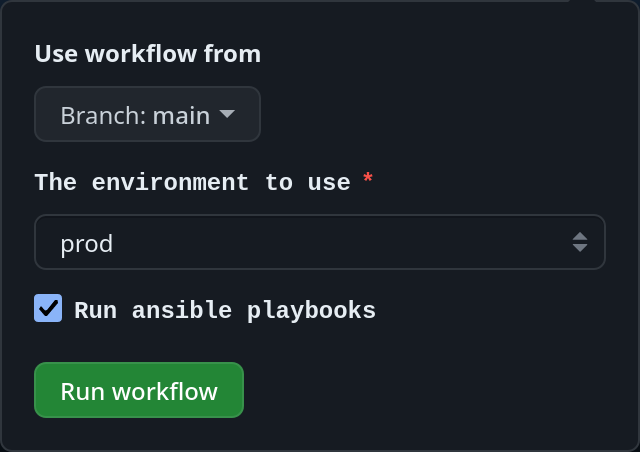
GitHub Actions
Deploying and destroying the CTF could be done at the click of a button. We used a workflow_dispatch trigger with an environment variable to allow us to easily create the infrastructure from start to finish using the GitHub web UI:
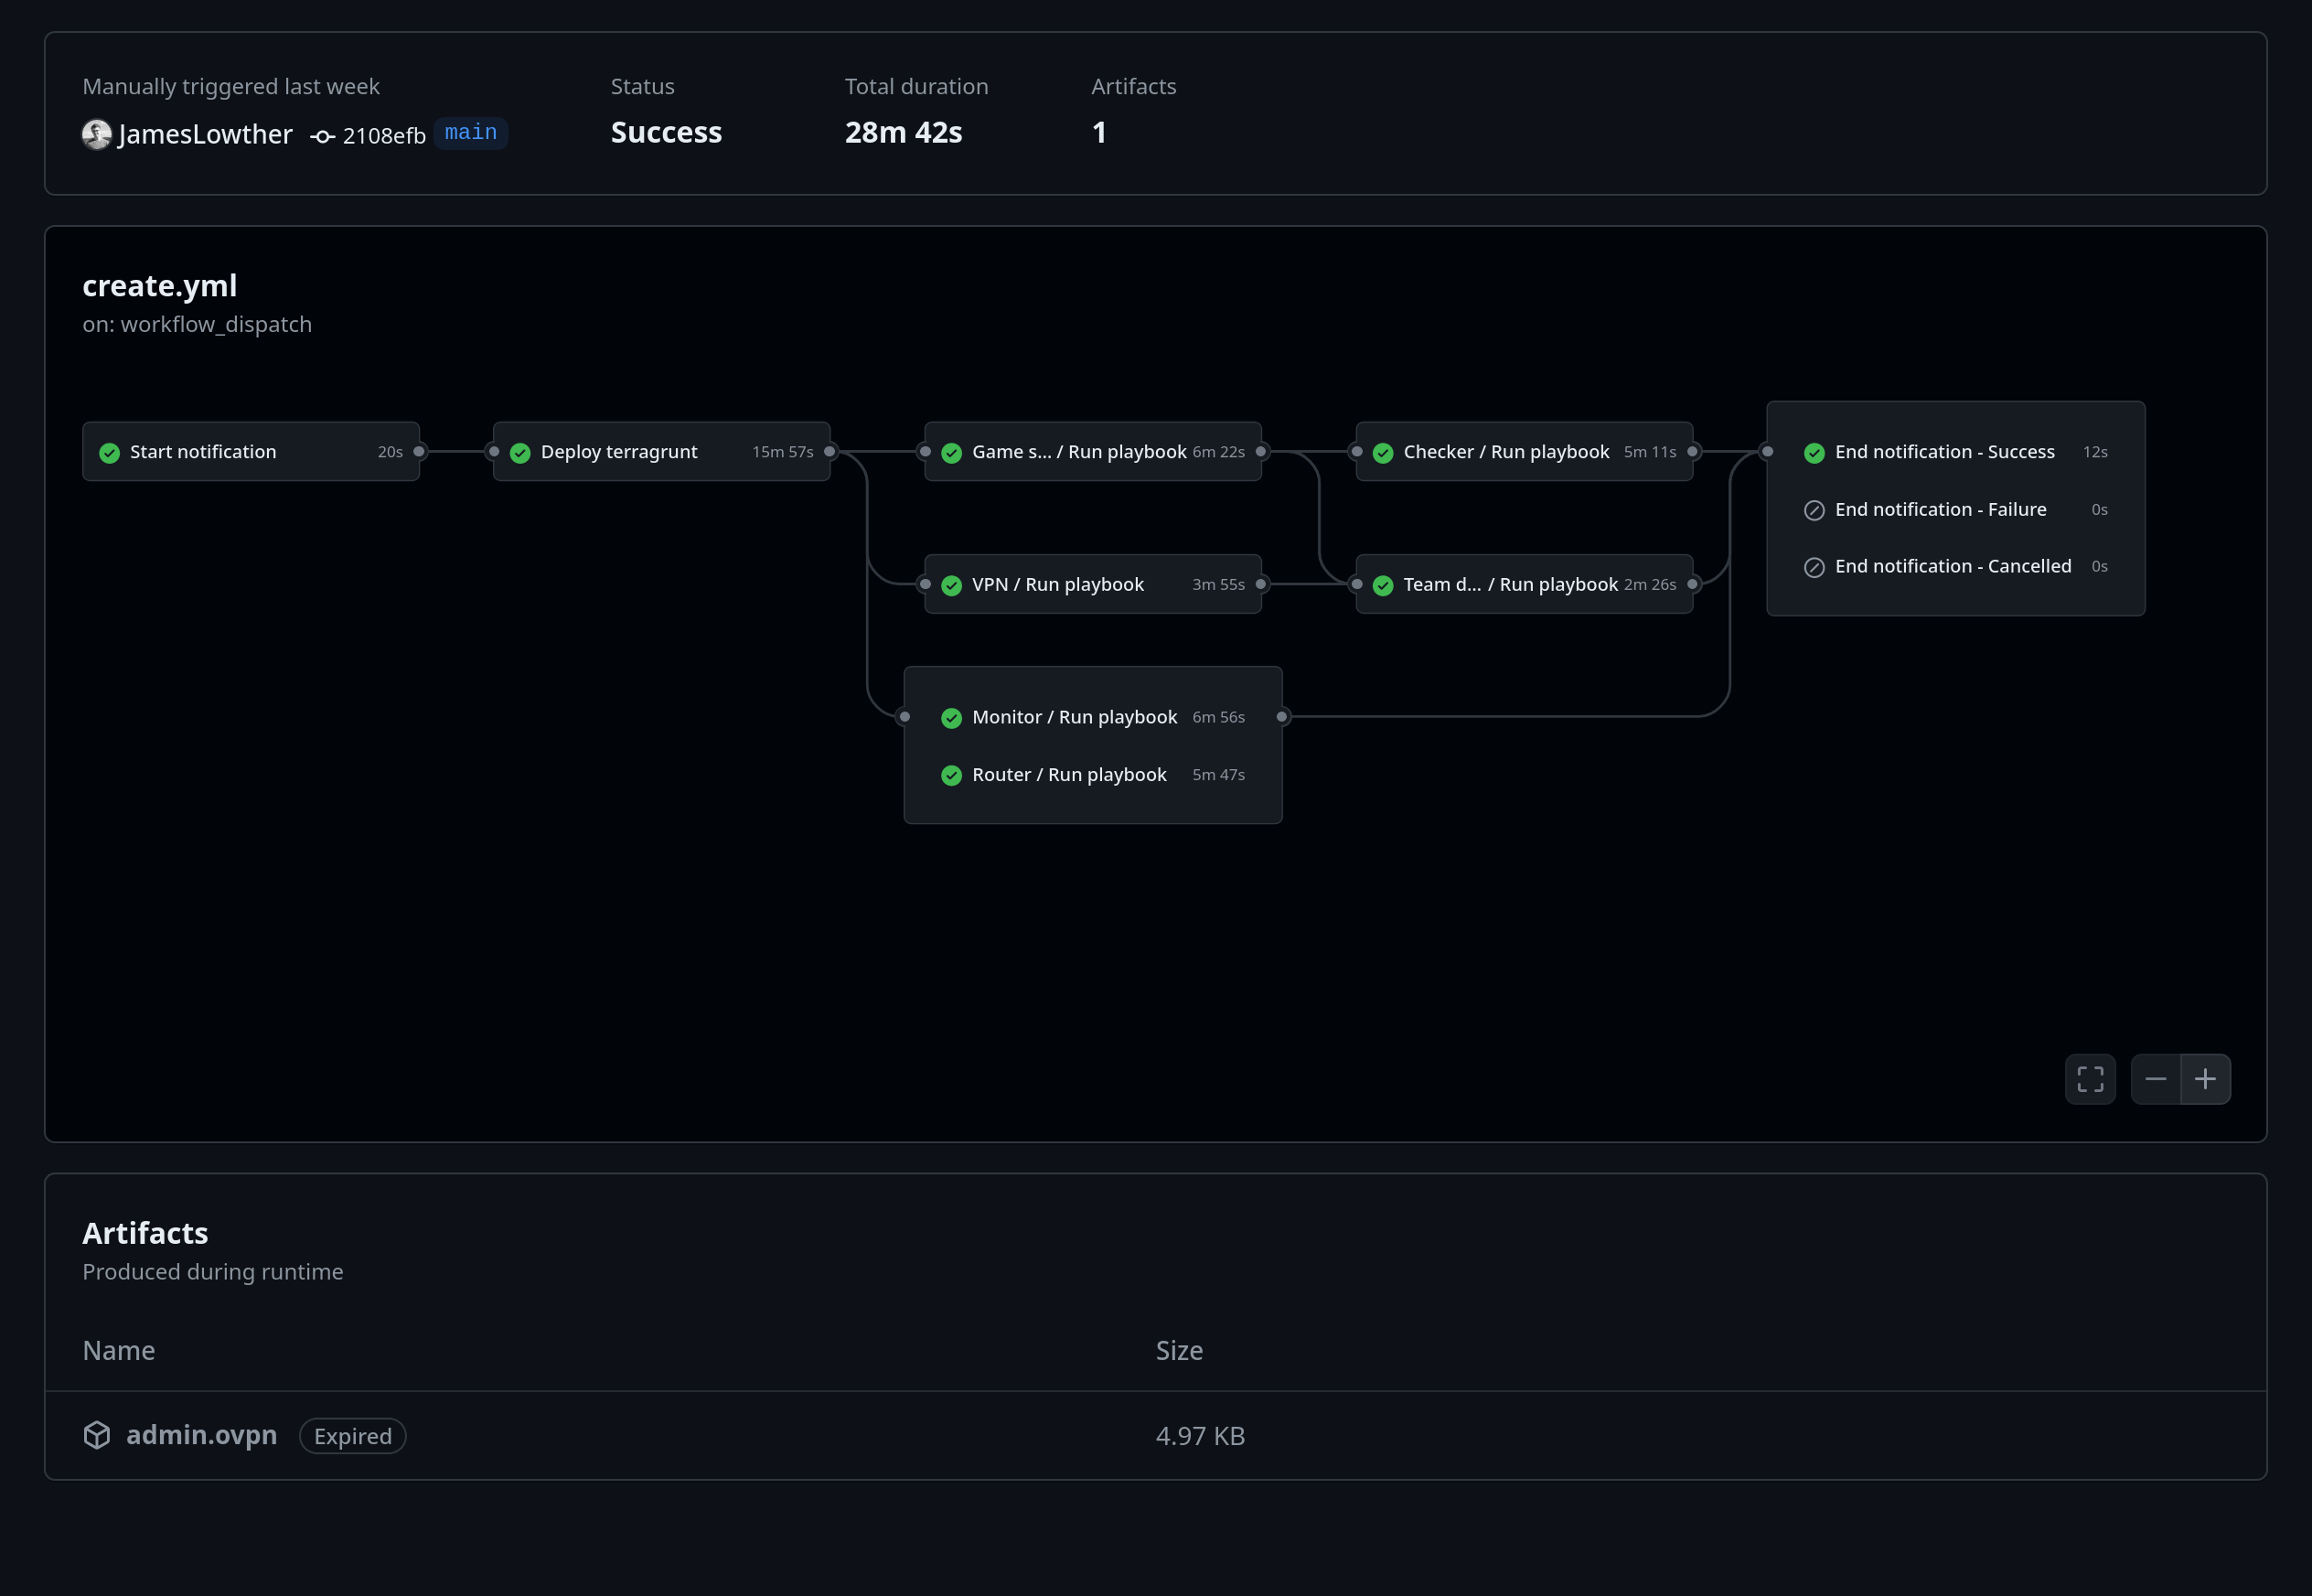
admin.ovpn
For convenience, we uploaded the administrative OpenVPN config file as an artifact on the GitHub Actions run. This config would bootstrap our access to the CTF services.
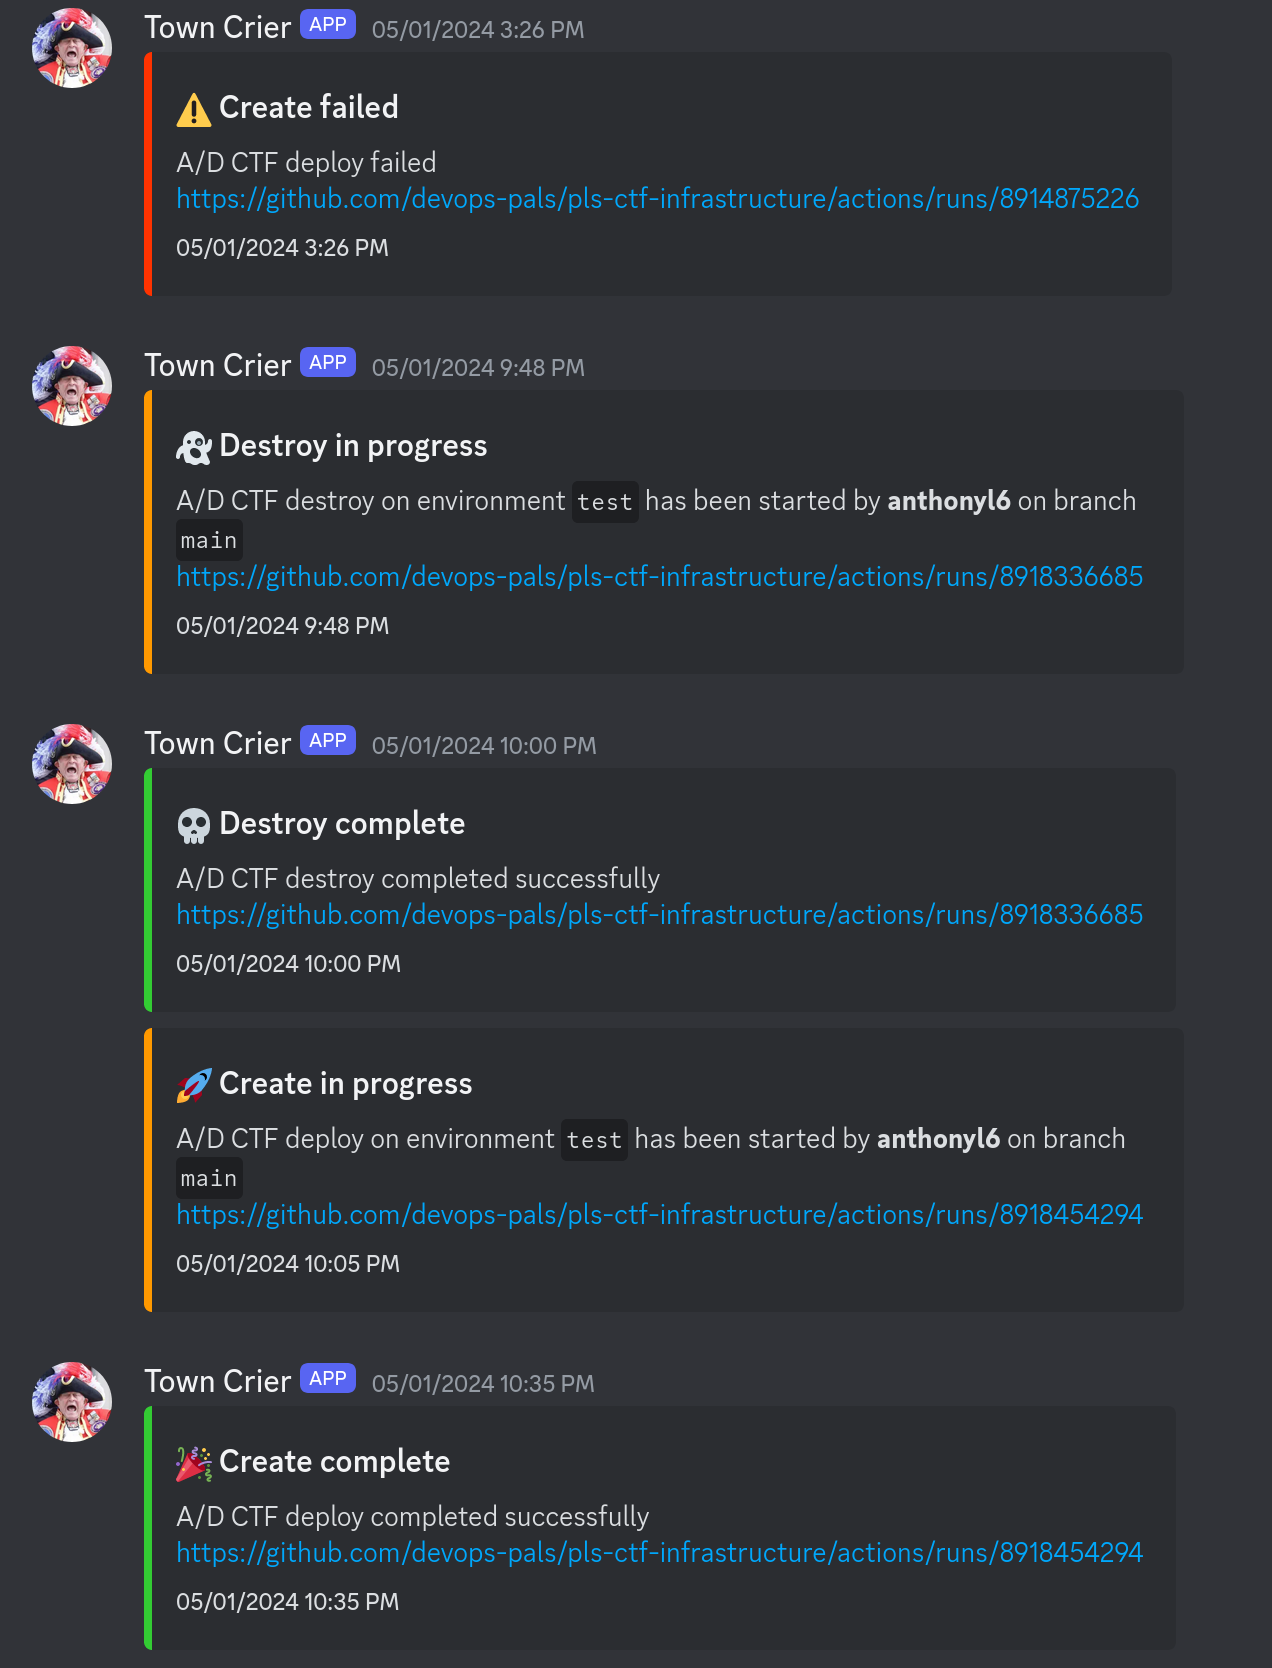
This would send notifications to us through Discord using a simple webhook, making sure everyone was aware when a deployment was started, completed, canceled, or failed.
Using GitHub Actions to start the deployment process gave developers who were less comfortable with cloud technologies the confidence to deploy the CTF. This allowed them to do their development in a real environment without any help from the infrastructure team.
Cost saving
This level of automation didn’t just save us time, but money as well. When we weren’t developing the CTF, we could easily destroy all of the infrastructure, knowing that we could create it again from scratch when we needed it. We didn’t have any sponsorship for this CTF, so this was important to us.
Monitoring
Deploying infrastructure is only half the battle. The other half is ensuring that your infrastructure/services are healthy. To do this we used Grafana and Prometheus, along with a variety of metric exporters, to monitor the health of the CTF. The FAUST game server is designed to expose Prometheus metrics, which influenced this choice.
Metrics
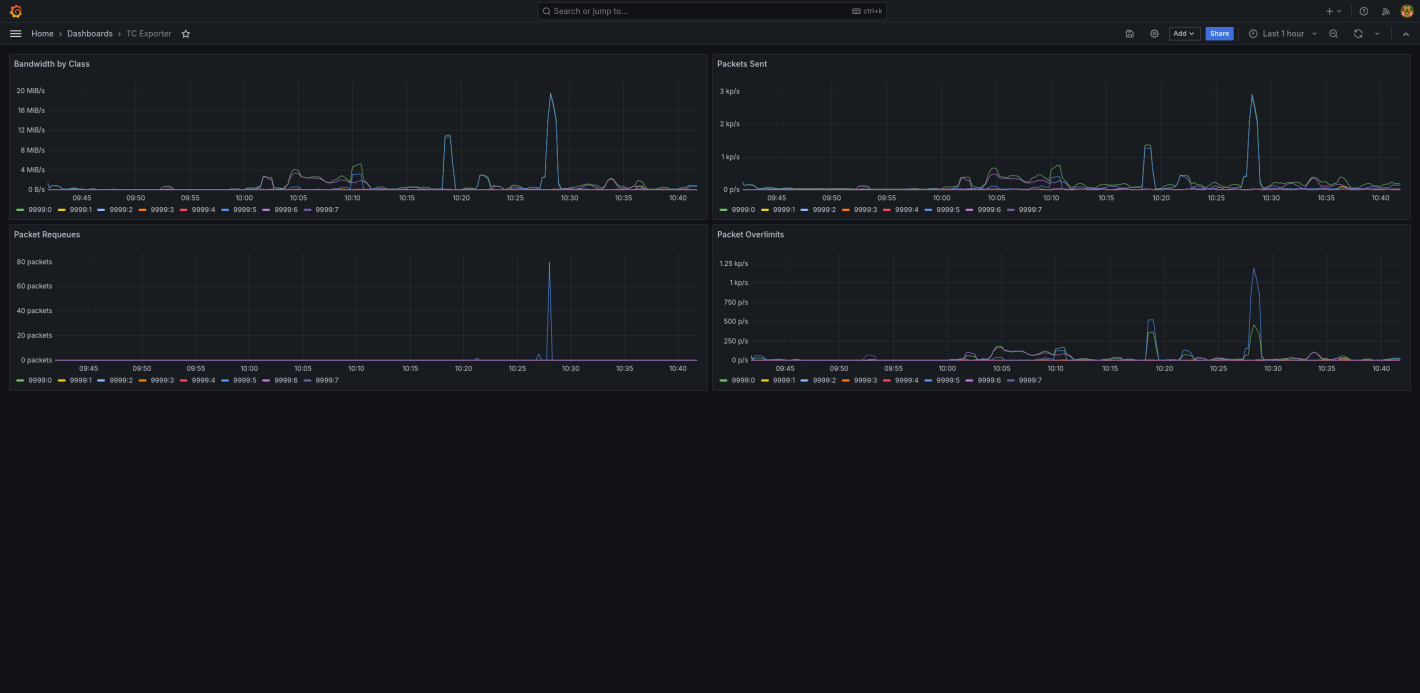
In Prometheus, we used ec2_sd_configs to dynamically configure scrape targets, meaning we could scale our resources and be confident they would be monitored. Every server was running node-exporter to provide the majority of our metrics. The router was also running tc_exporter to provide metrics about our bandwidth limiting with TC.
VPN interfaces
By default, node-exporter will bind itself to all interfaces. This means if you run it on the VPN server, it will be bound to all of the
tuninterfaces created by OpenVPN. This can expose your metrics to teams. To fix this, we configured node-exporter to only bind was to the interface that was behind a security group.
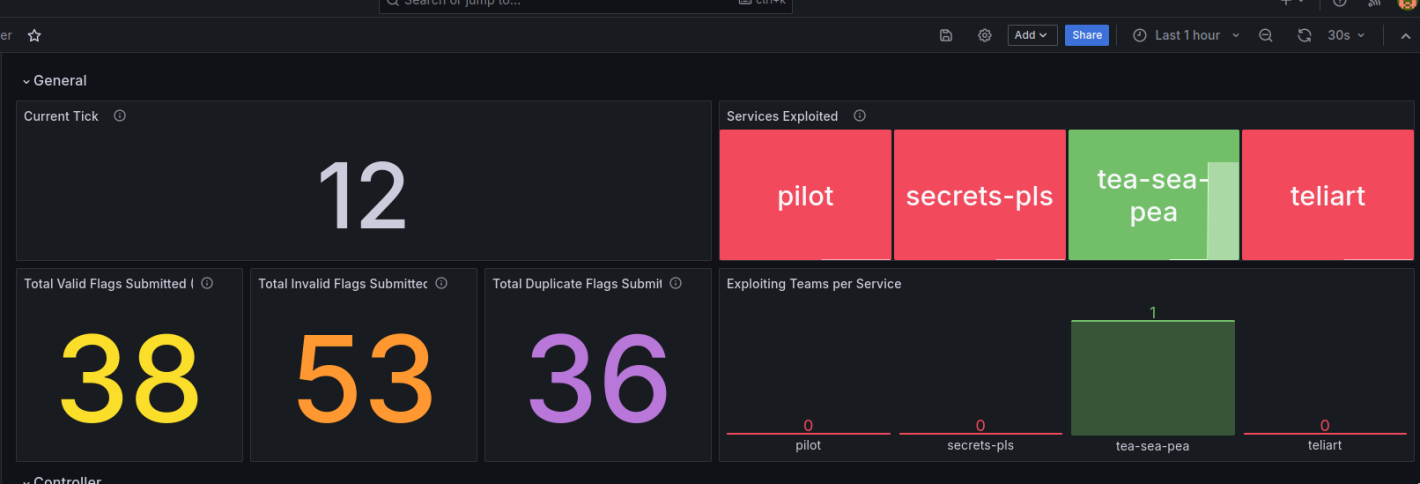
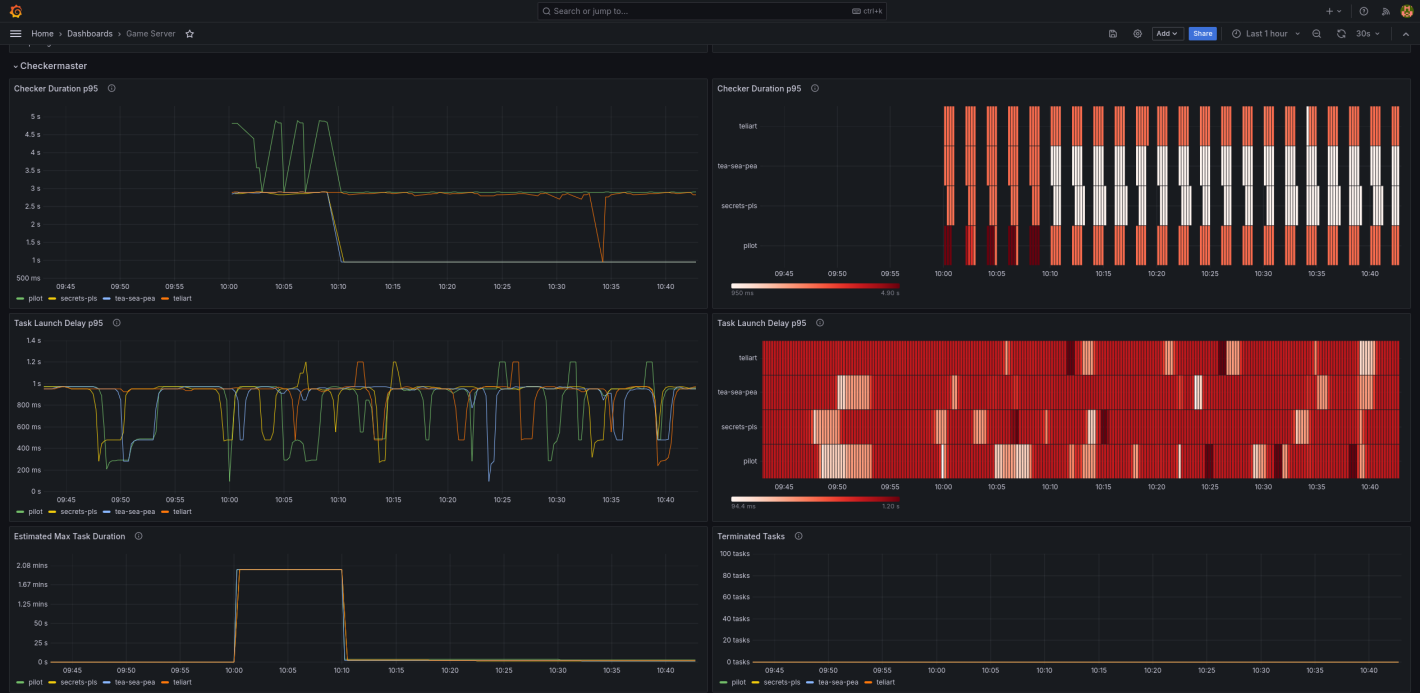
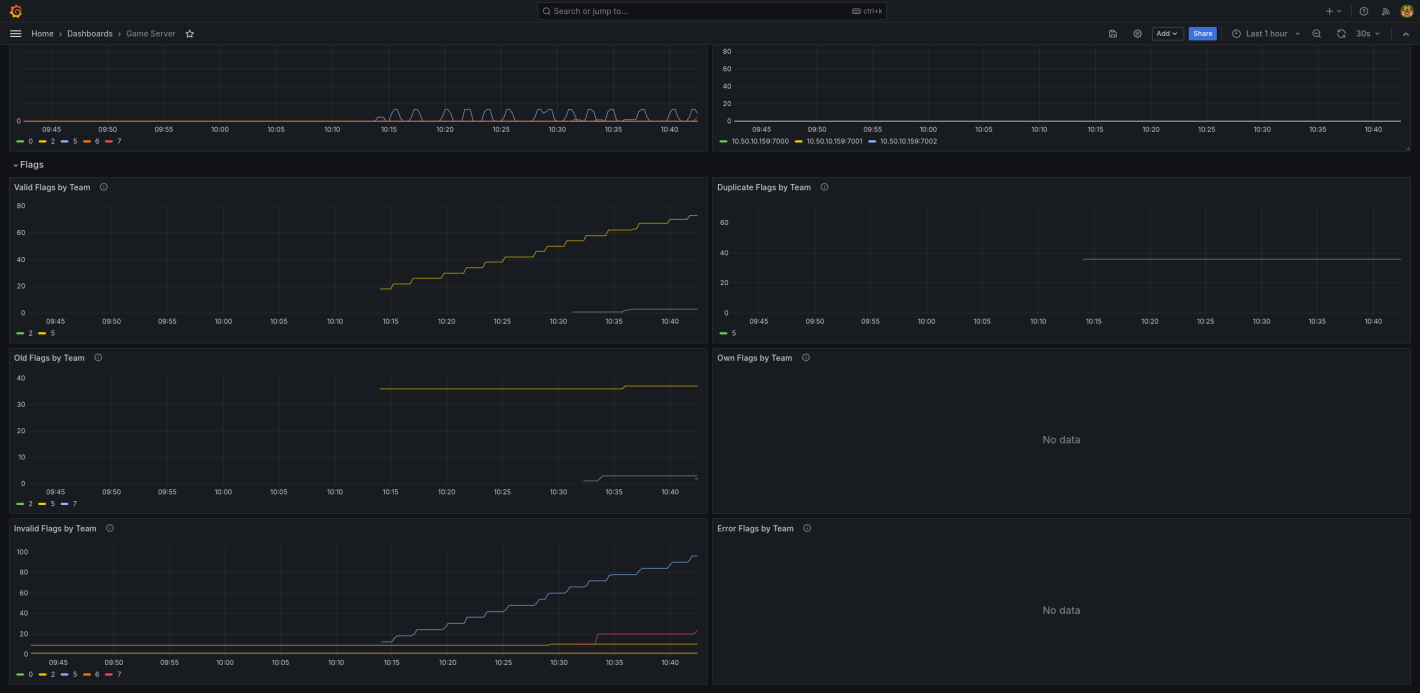
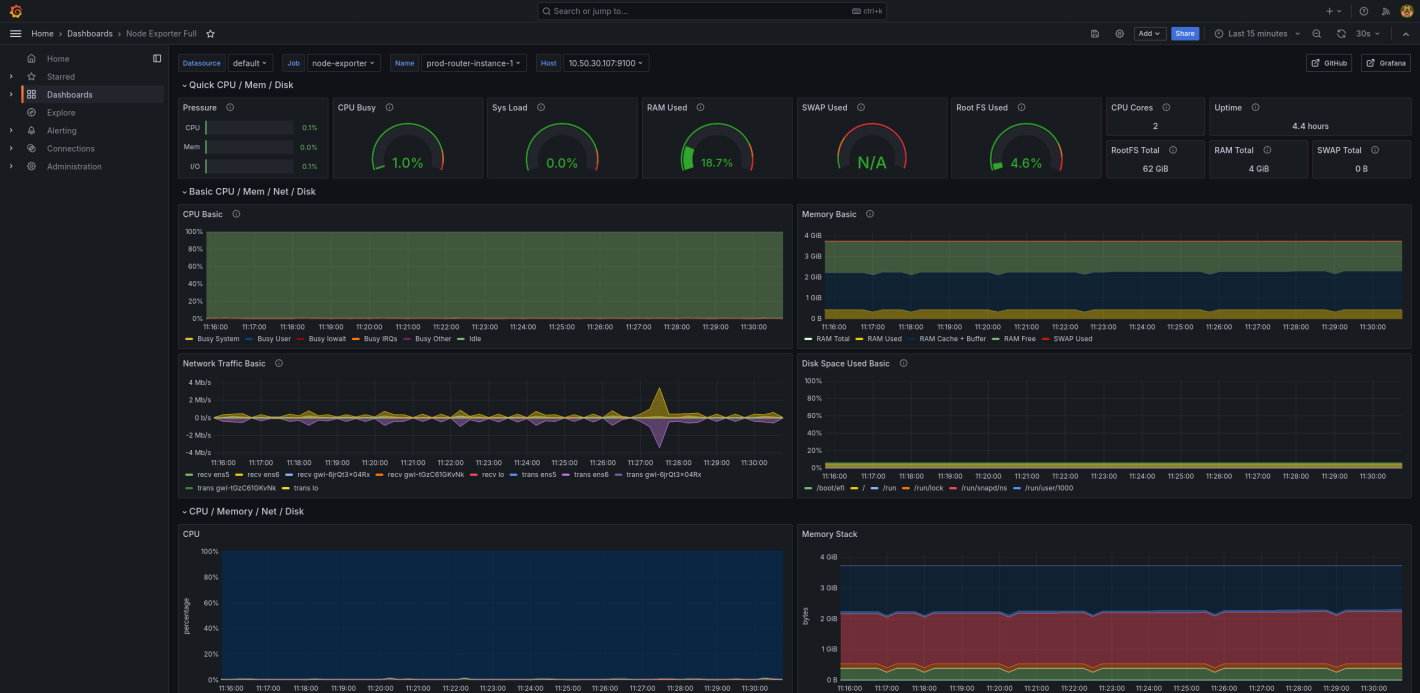
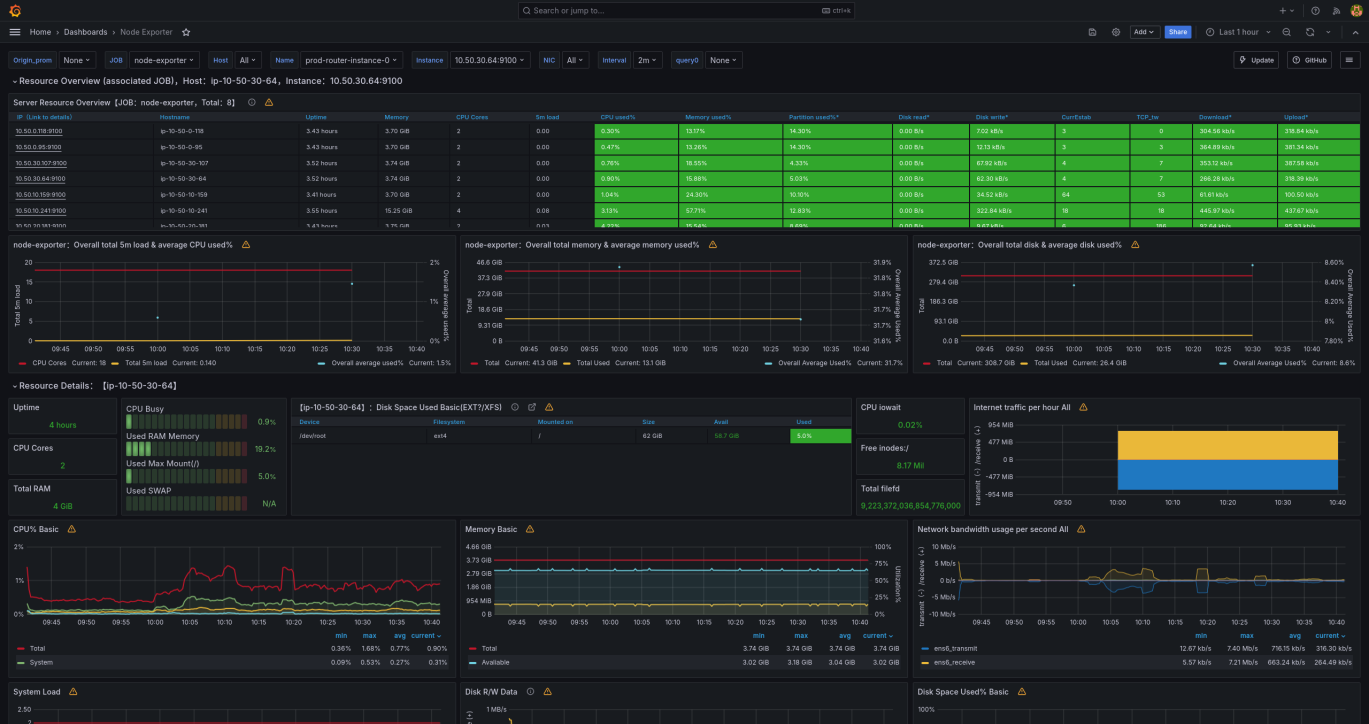
We used a number of pre-built node exporter dashboards in Grafana, such as Node Exporter Full, to help us visualize the health of our servers. We built a custom dashboard using the metrics provided by the game server, to monitor how well the game server services were running.
Game server dashboard
Node exporter dashboard
TC dashboard
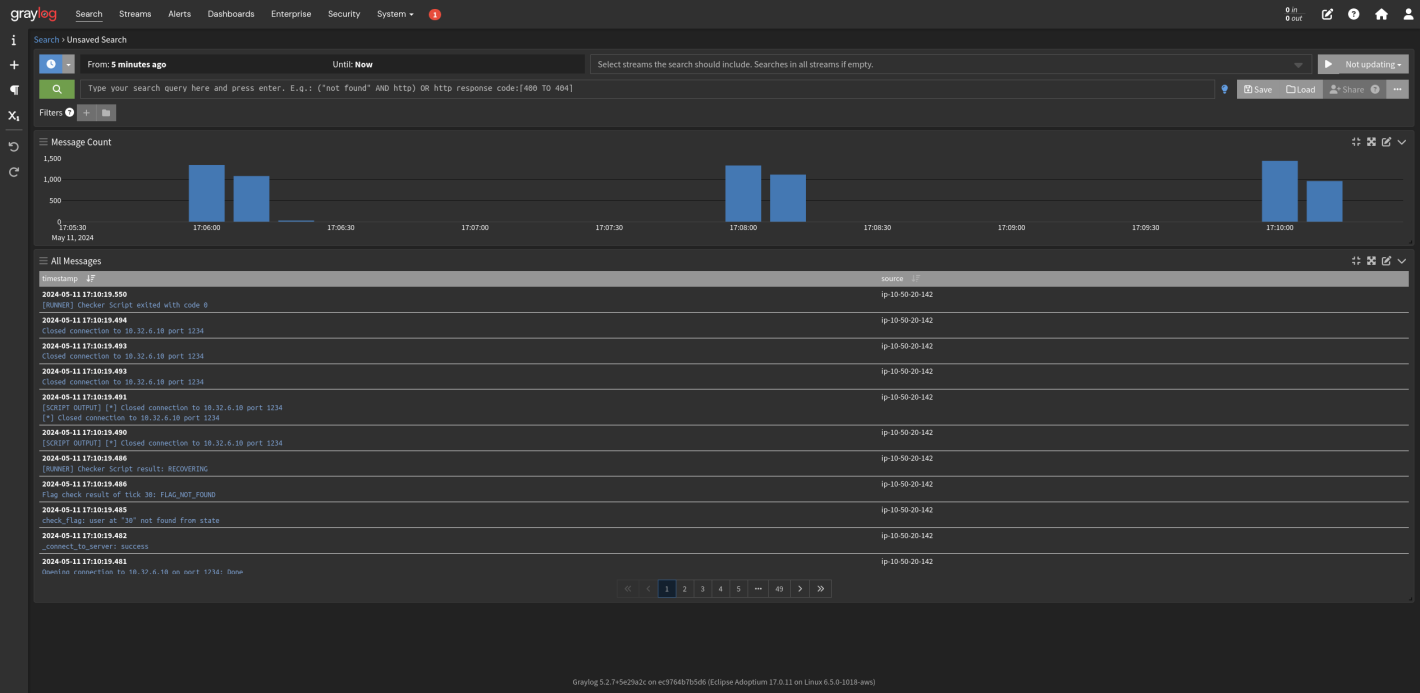
Logs
For checker logs, we used Graylog, as recommended by the FAUST team. The game server services integrate nicely with Graylog, making the monitoring of checker output trivial.
Network
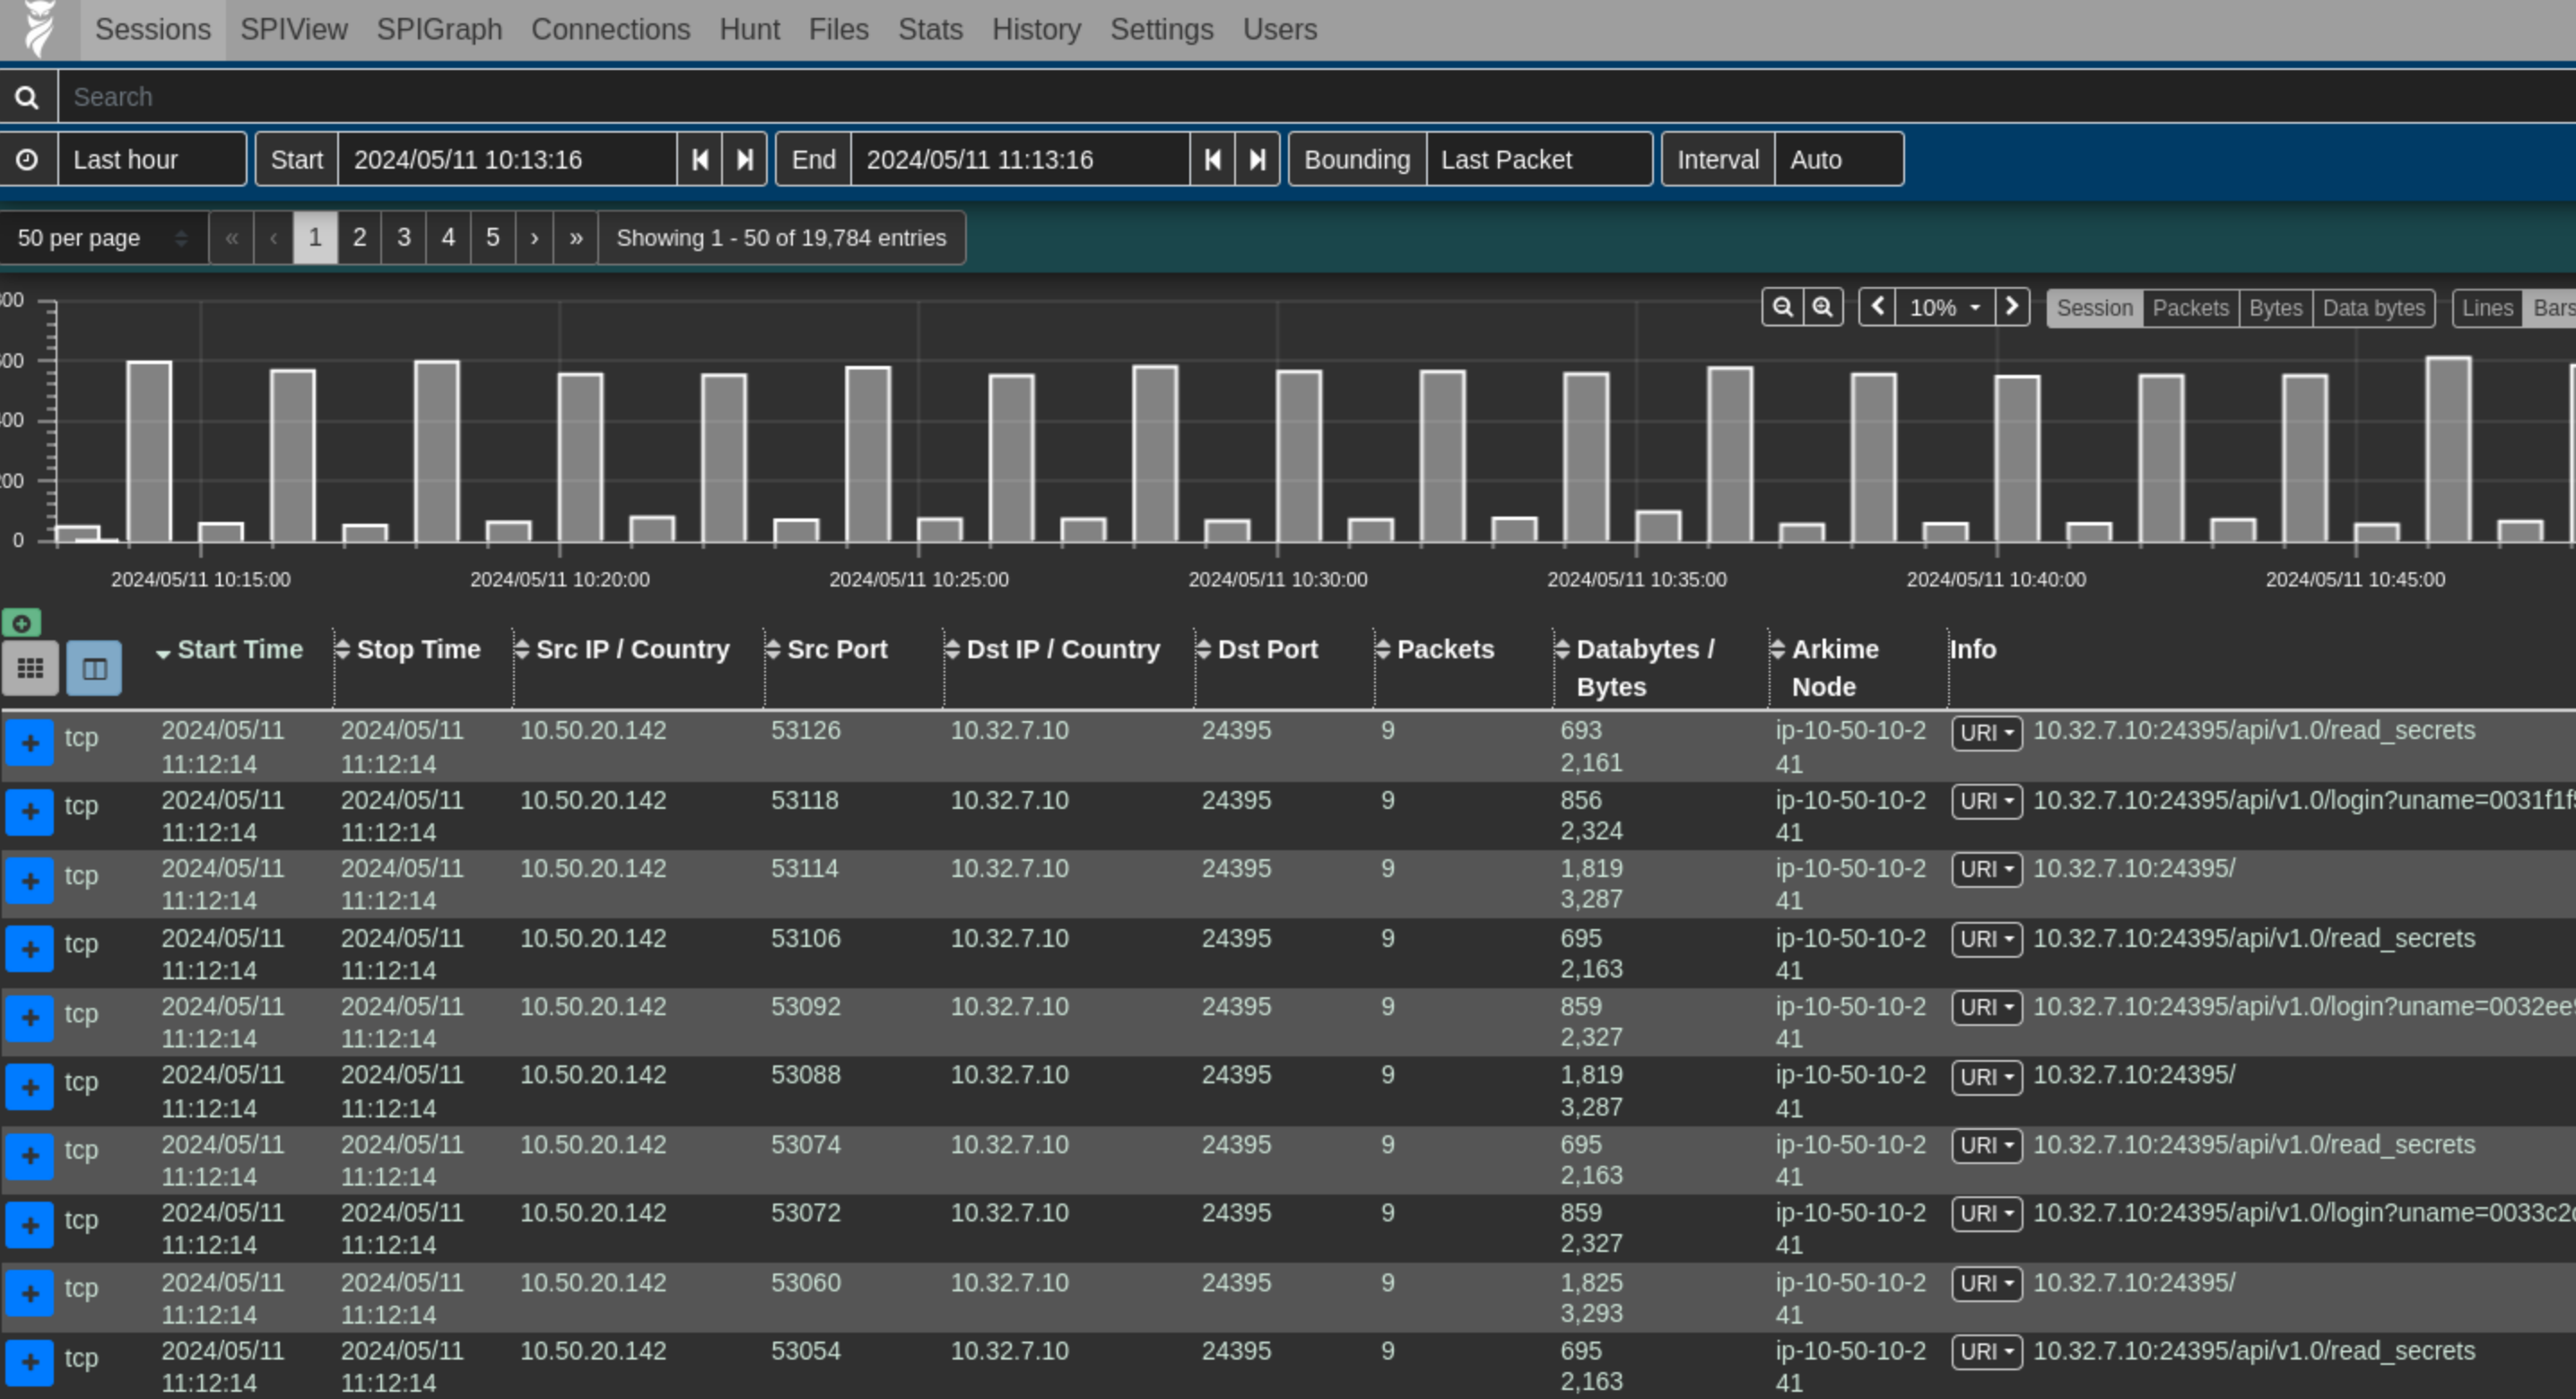
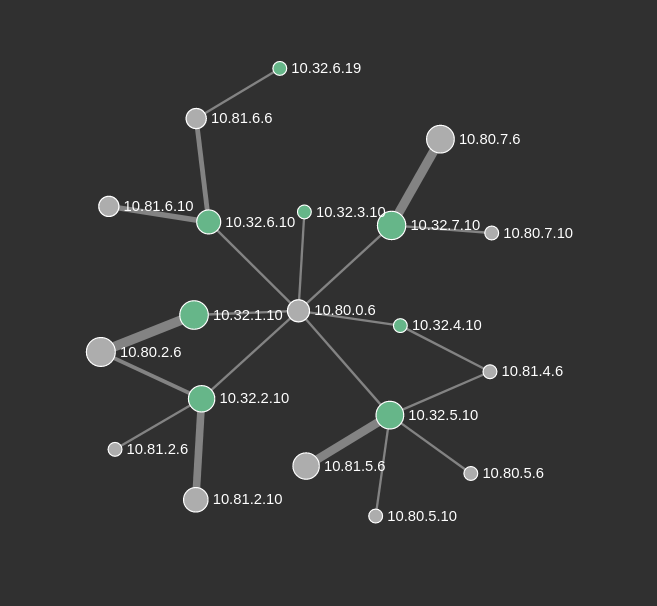
To capture network traffic, we had a tcpdump running directly on the router instances. In addition, we used VPC traffic mirroring to create packet mirrors to a server running Arkime from our router ENIs. This allowed us to inspect individual packets for malicious attacks. We configured it to show us packet flows before the MASQ took place, so we could see exactly what each team was sending to each other.
Packet count
Arkime also allowed us to view connections as a graph, and configure the link weights based on the amount of traffic. We could have theoretically used this as a way to identify DoS attacks, but none ended up happening.
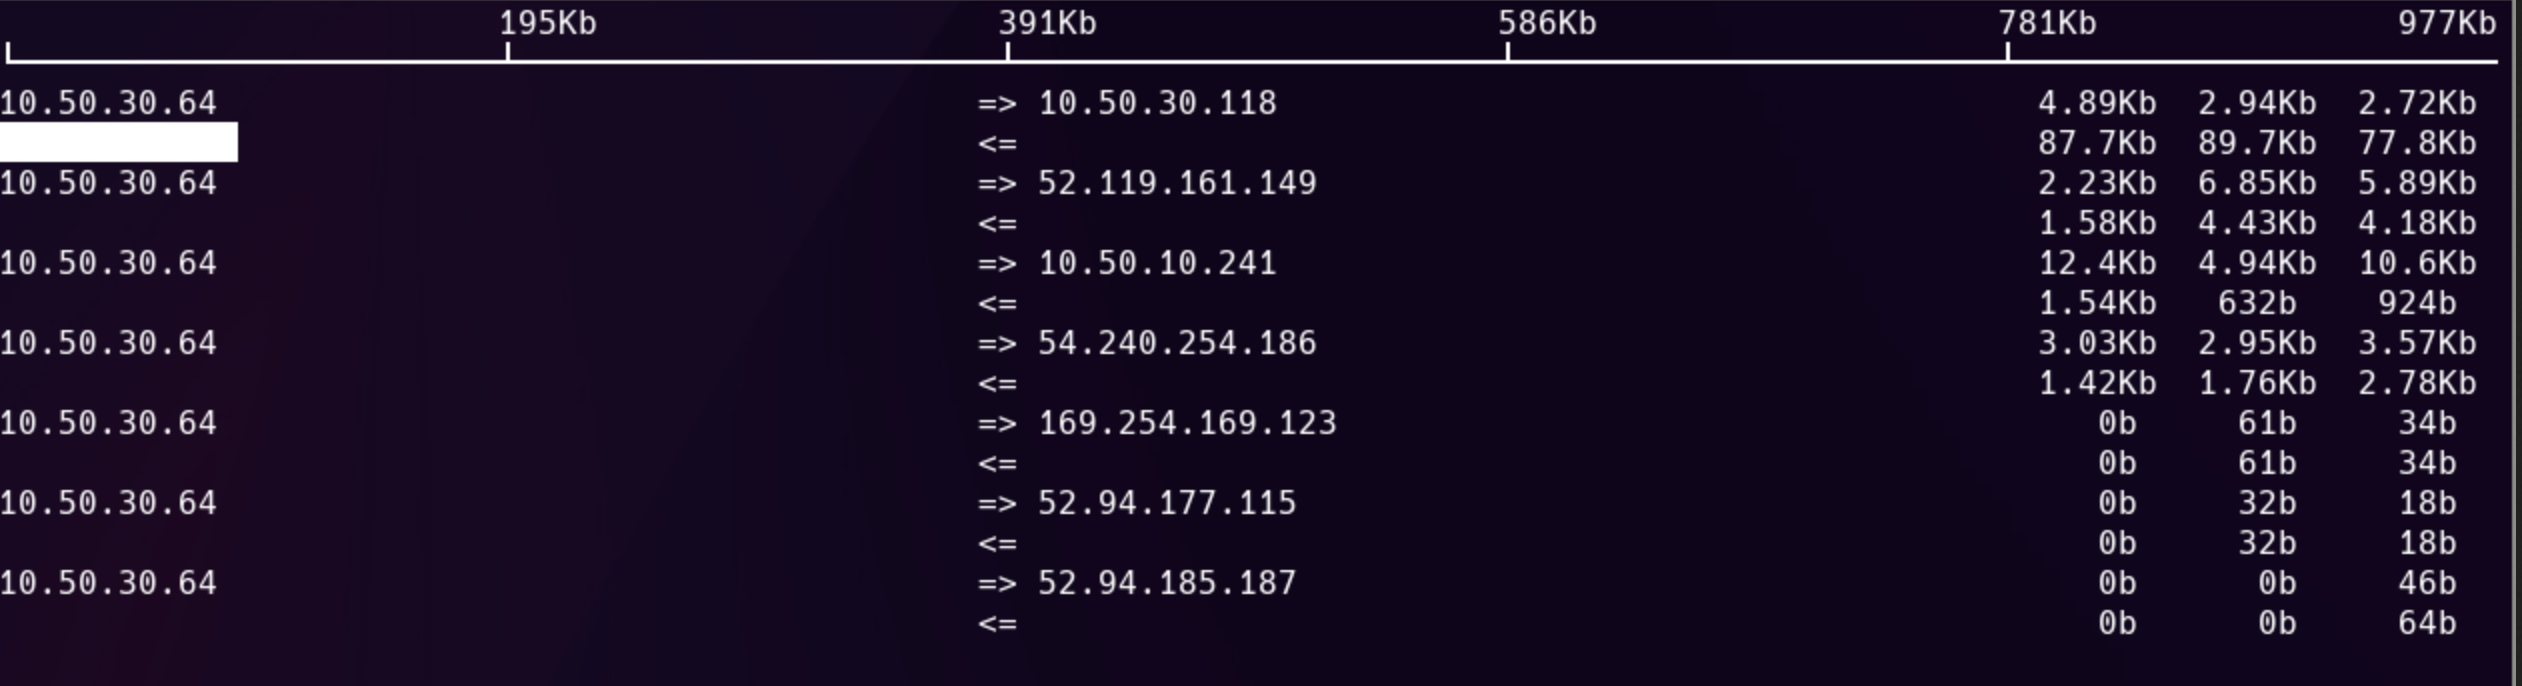
We also utilized iftop on the router instances to monitor bandwidth:
Practice environment
3 days before the CTF we created a practice environment to give competitors the opportunity to test connecting to the VPN and logging in to their vulnbox. We had a dummy service running on the vulnbox that helped new players understand the A/D format.
The practice environment was very beneficial to have because it helped identify some minor issues that we were able to fix before the actual CTF. It also gave us confidence to know that our VPN configurations would work on a variety of operating systems/home networks.
Game day
The actual CTF ran very smoothly. We had dramatically over-provisioned our servers for the amount of traffic (a good problem to have), and didn’t have any critical failures. Teams seemed to enjoy the competition, so that was a good feeling after such a long development period.
AWS quotas
About 4 days before the CTF, we found a fairly major problem. I hadn’t realized that for the past 8 months of development, we were hitting 80% of the vCPU quota AWS had given to our account. We were only allowed to create 32 vCPUs worth of EC2s. When I went to create our production environment, the deployment failed. I created a support ticket with AWS, pleading with them to increase our limit, but they were not able to action the request in time
In the end, we were able to reduce the core count to use exactly 32 vCPUs. This allowed us to provision enough servers for each team’s vulnbox, and create at least two routers and VPN servers. If another team wanted to play, we would have had to make some sacrifices.
The lesson learned: Always check your quotas in cloud environments!
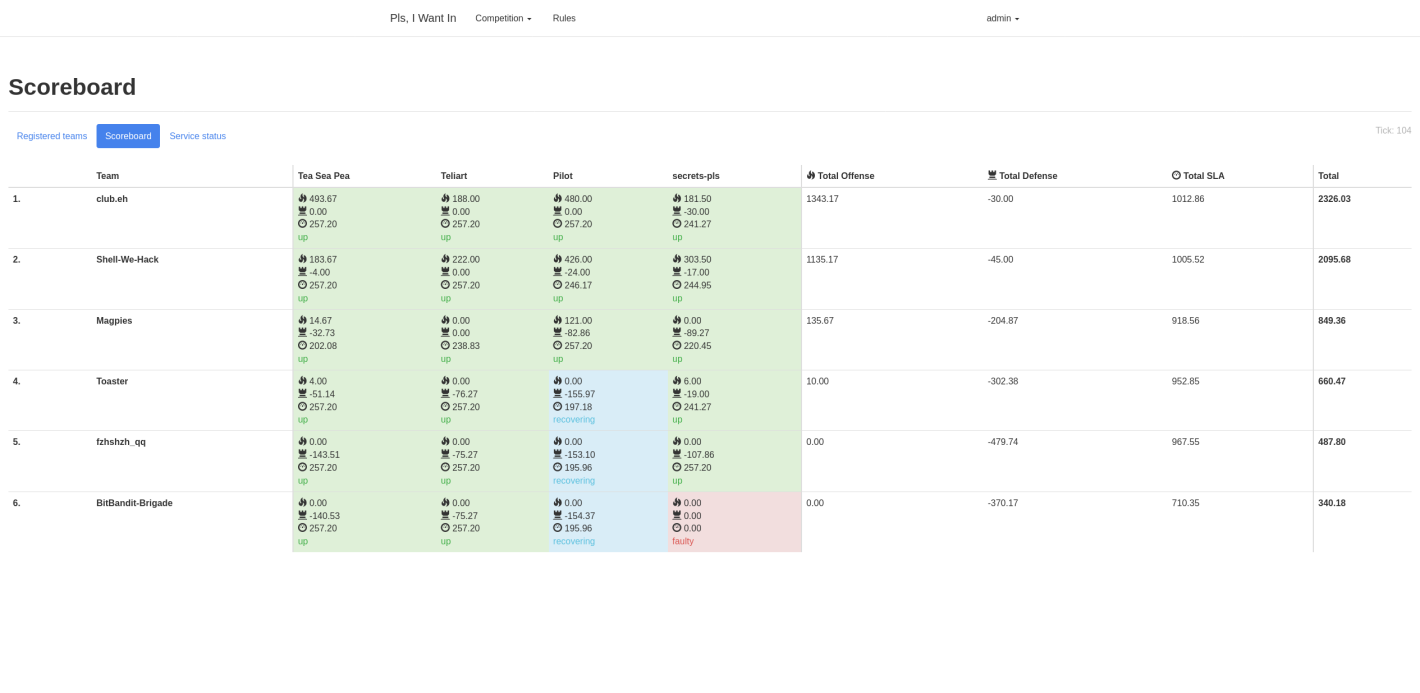
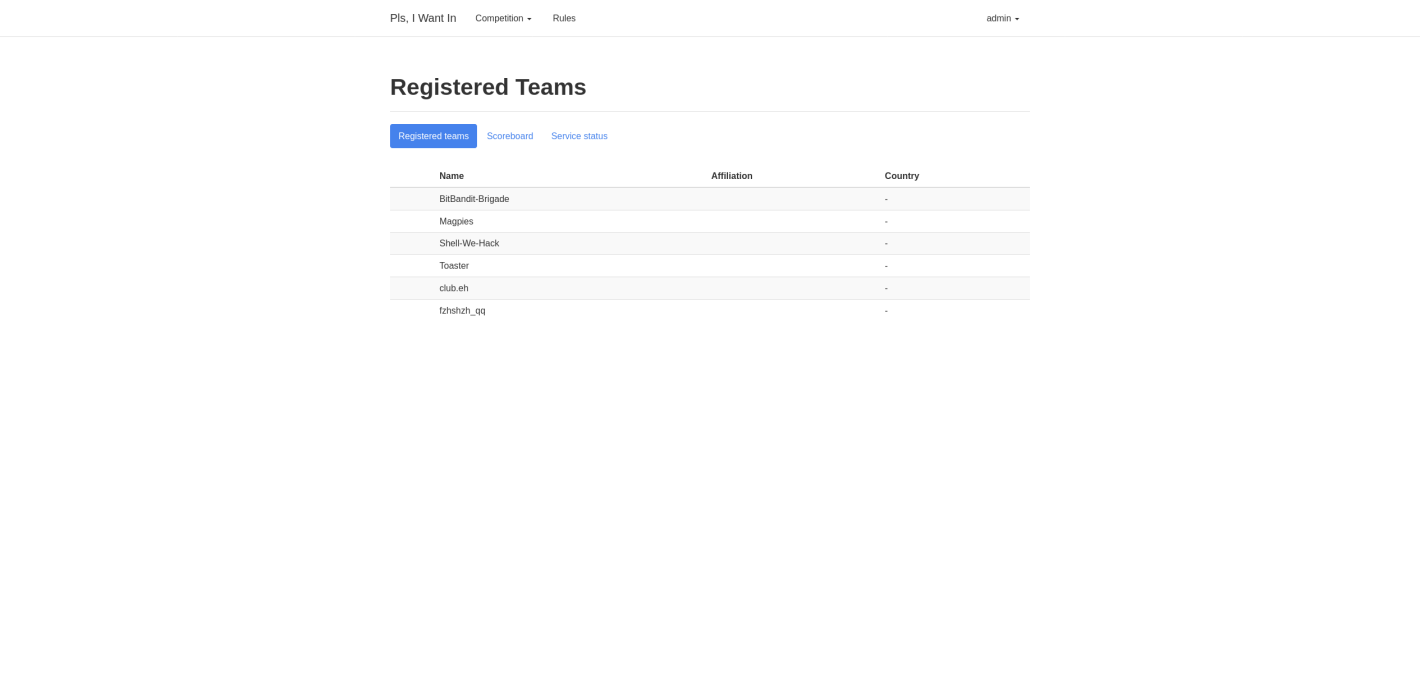
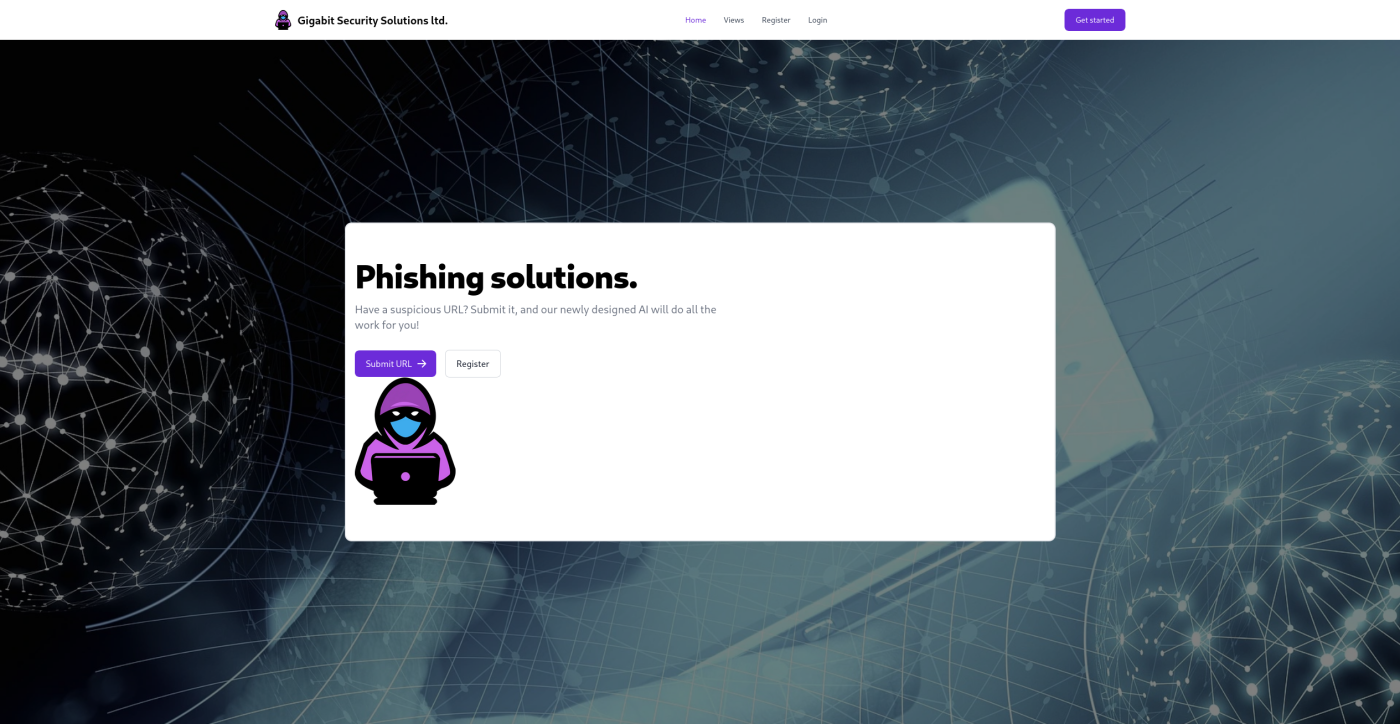
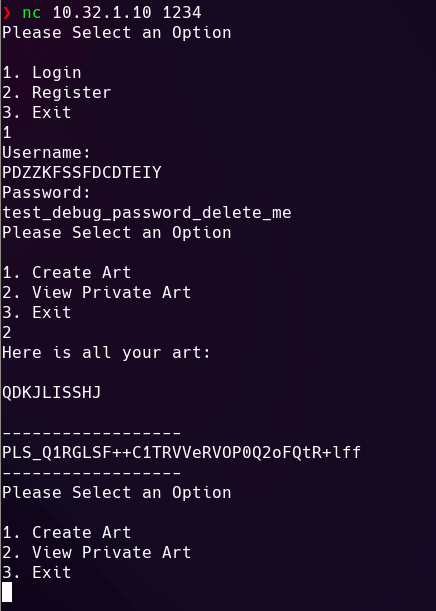
Screenshots
Here are some screenshots of the services and scoreboards from the CTF:
Game server
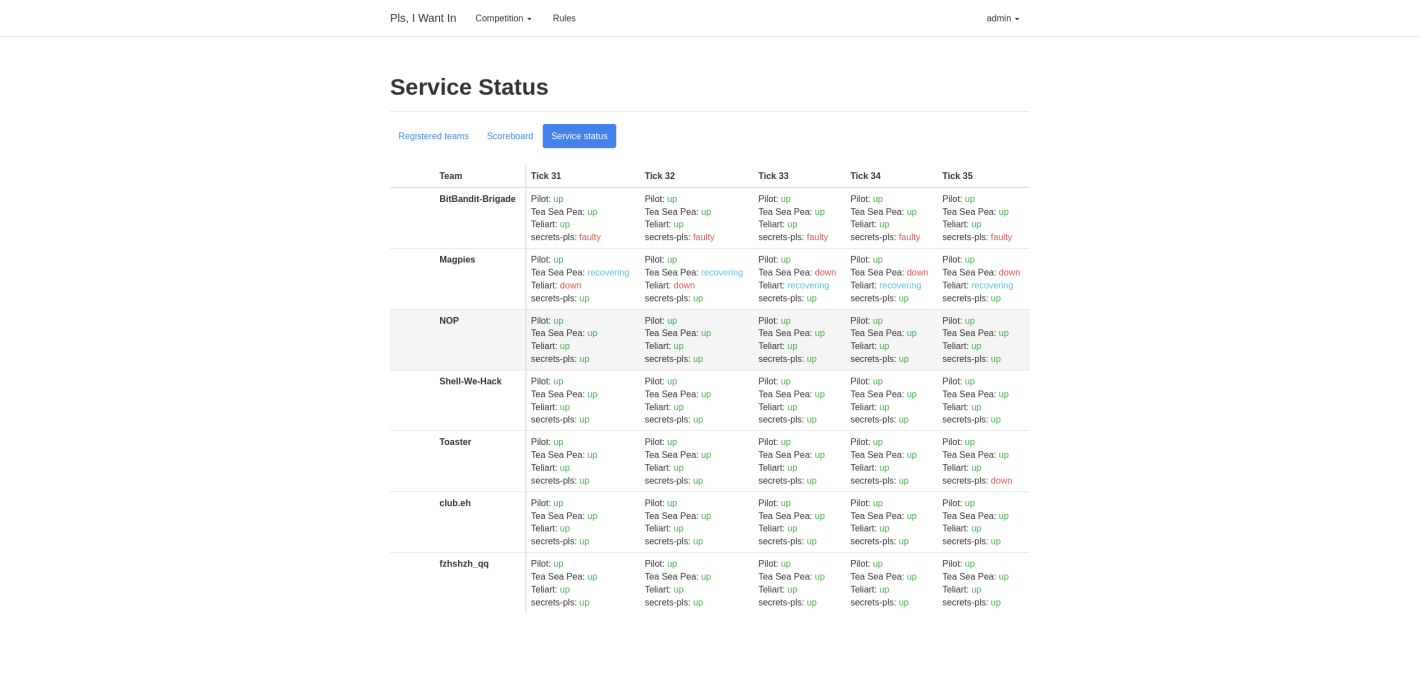
Services
secrets-pls

Tea-Sea-Pea

Pilot
Teliart
Improvements
If we were to run this again I would propose we make the following improvements:
- Create AMIs for all EC2s.
- The majority of the time it took to deploy the CTF was spent provisioning the servers with Ansible.
- By creating AMIs, the servers could start pre-configured.
- Could also move a lot of these services to containers.
- Improve the structure of the Terraform modules
- Right now the modules are highly coupled and difficult to change.
- Add scaling support to the Django web app and submission server.
- These services don’t need a lot of computational power, so they don’t need to be scaled for a successful CTF.
- I’m more interested in improving the fault tolerance here, allowing us to do server maintenance without affecting the game.
- Add scaling to our monitoring servers.
- This is less critical, as the game can run without the monitoring stack functioning correctly.
- Put a network load balancer in front of the OpenVPN servers.
- This is to allow us to scale without worrying about EIP quotas in AWS.
- Might increase cost slightly.
- Make the infrastructure multi-AZ.
- AZ failure is not high on our list of problems, but it would be nice to have it as a matter of principle.
- Add support for self-hosted vulnboxes
- This is something FAUST CTF provides and would offload a lot of the cost of the CTF to the competitors.
- Would also help to prevent hitting vCPU quotas in AWS.
- Move to IPv6.
- Right now we can support up to 255 teams. Moving to IPv6 would remove this limitation.
- Add auto-scaling.
- All scaling is currently done manually. Scaling automatically based on load would be cool.
- This would be easier to accomplish if we moved to container-based infrastructure.
- Add fault tolerance to the database instances.
- If a database node fails, the game should go on.
So much to do… so little time.
Conclusion
Overall, Pls, I Want In 2024 was a success. I learned a lot about how to build medium-scale applications in AWS, automation, pipelining, and working with a team. This was one of the most complicated and dynamic projects I have ever worked on, and it allowed me the opportunity to learn a tonne and improve my skills with cloud technologies.
I wanted to thank all of the competitors for participating and being so encouraging. It was your support that made all of our hard work worth it. I also want to thank the rest of Pls, I Want In organizing team, as the competition would not have existed without the work you put in. Thank you.